

A peace-hand sign always makes me think of the 60s with the decade’s bell bottom jeans, long hair and tie dye clothing. I decided to attempt a tie dye background for the Simon Says Stamp Still Here stamp set*, part of October’s Sending Cheer release.
I experimented with several techniques to get a tie dye look. Using just the edges of a rainbow of Distress Ink cubes, I made concentric rectangles on a 4.5 x 6.25” (that’s A6 size) piece of Tim Holtz Distress Watercolor paper. I added water to the very center and hoped it would give a tie dye look as the water spread. It almost worked, but left a distinctly rectangle shape of ink swipes on the paper. I abandoned that one and then just tried to use my Distress Ink Sprays on wet watercolor paper. I used Spun Sugar, Picked Raspberry, Abandoned Coral, Spiced Marmalade, Mustard Seed, and a very small amount of Shabby Shutters (barely visible). That worked better, but I still lacked the concentric circles I was looking for. I took this panel and simply added big concentric circles with a paintbrush dipped in clean water. That got closer to what I wanted, and I stopped there to dry the panel and flatten it under some books for a little while.
Next, I stamped the peace-hand sign in black VersaFine Clair Nocturne ink in the middle of the panel. I did the same with the 2 sentiments. I die cut this with one die from the Spellbinders Essential Modern Ovals die set. I cut a larger oval from Taylored Expressions Lollipop Cardstock.

I really wanted a sunburst in the background of my oval, but I ran into a problem (and found a workaround). I had a great 6x6” Sunburst Stencil from Waffle Flower but it didn’t cover an A6 panel. I ink blended with Altenew’s Maple Yellow ink from the center outwards with a large blending brush. On the left and right, I could go to the edge of the paper before I ran into the edge of the stencil. However, on the top and bottom, I had to make sure I didn’t touch the frame edge of the stencil with my blending brush. I removed the stencil and then extended the sunburst ray edges with Post It tape and kept blending to the edge of my paper. It worked great. (See photos for details)


I trimmed about 1/8” from each side of my yellow sunburst panel and used foam adhesive to mat it on an A6 piece of black cardstock. Next I glued on my oval. I added just a couple gems in the center of the largest flowers for a bit of sparkle.

If you shop from the highlighted product links above, I may receive a small commission at no cost to you. It is much appreciated and helps fund my crafting. Also, any item first marked with an asterisk * was provided by an online store. Otherwise, I bought my supplies.
A peace-hand sign always makes me think of the 60s with the decade’s bell bottom jeans, long hair and tie dye clothing. I decided to attempt a tie dye background for the Simon Says Stamp Still Here stamp set*, part of October’s Sending Cheer release.
I experimented with several techniques to get a tie dye look. Using just the edges of a rainbow of Distress Ink cubes, I made concentric rectangles on a 4.5 x 6.25” (that’s A6 size) piece of Tim Holtz Distress Watercolor paper. I added water to the very center and hoped it would give a tie dye look as the water spread. It almost worked, but left a distinctly rectangle shape of ink swipes on the paper. I abandoned that one and then just tried to use my Distress Ink Sprays on wet watercolor paper. I used Spun Sugar, Picked Raspberry, Abandoned Coral, Spiced Marmalade, Mustard Seed, and a very small amount of Shabby Shutters (barely visible). That worked better, but I still lacked the concentric circles I was looking for. I took this panel and simply added big concentric circles with a paintbrush dipped in clean water. That got closer to what I wanted, and I stopped there to dry the panel and flatten it under some books for a little while.
Next, I stamped the peace-hand sign in black VersaFine Clair Nocturne ink in the middle of the panel. I did the same with the 2 sentiments. I die cut this with one die from the Spellbinders Essential Modern Ovals die set. I cut a larger oval from Taylored Expressions Lollipop Cardstock.
I really wanted a sunburst in the background of my oval, but I ran into a problem (and found a workaround). I had a great 6x6” Sunburst Stencil from Waffle Flower but it didn’t cover an A6 panel. I ink blended with Altenew’s Maple Yellow ink from the center outwards with a large blending brush. On the left and right, I could go to the edge of the paper before I ran into the edge of the stencil. However, on the top and bottom, I had to make sure I didn’t touch the frame edge of the stencil with my blending brush. I removed the stencil and then extended the sunburst ray edges with Post It tape and kept blending to the edge of my paper. It worked great. (See photos for details)
I trimmed about 1/8” from each side of my yellow sunburst panel and used foam adhesive to mat it on an A6 piece of black cardstock. Next I glued on my oval. I added just a couple gems in the center of the largest flowers for a bit of sparkle.
If you shop from the highlighted product links above, I may receive a small commission at no cost to you. It is much appreciated and helps fund my crafting. Also, any item first marked with an asterisk * was provided by an online store. Otherwise, I bought my supplies.

For my final card to introduce the Classic Friendship stamp set* by Cathy Zielske and Simon Says Stamp in their Always There release, I pulled out my beloved Waffle Flower Postage Collage dies.
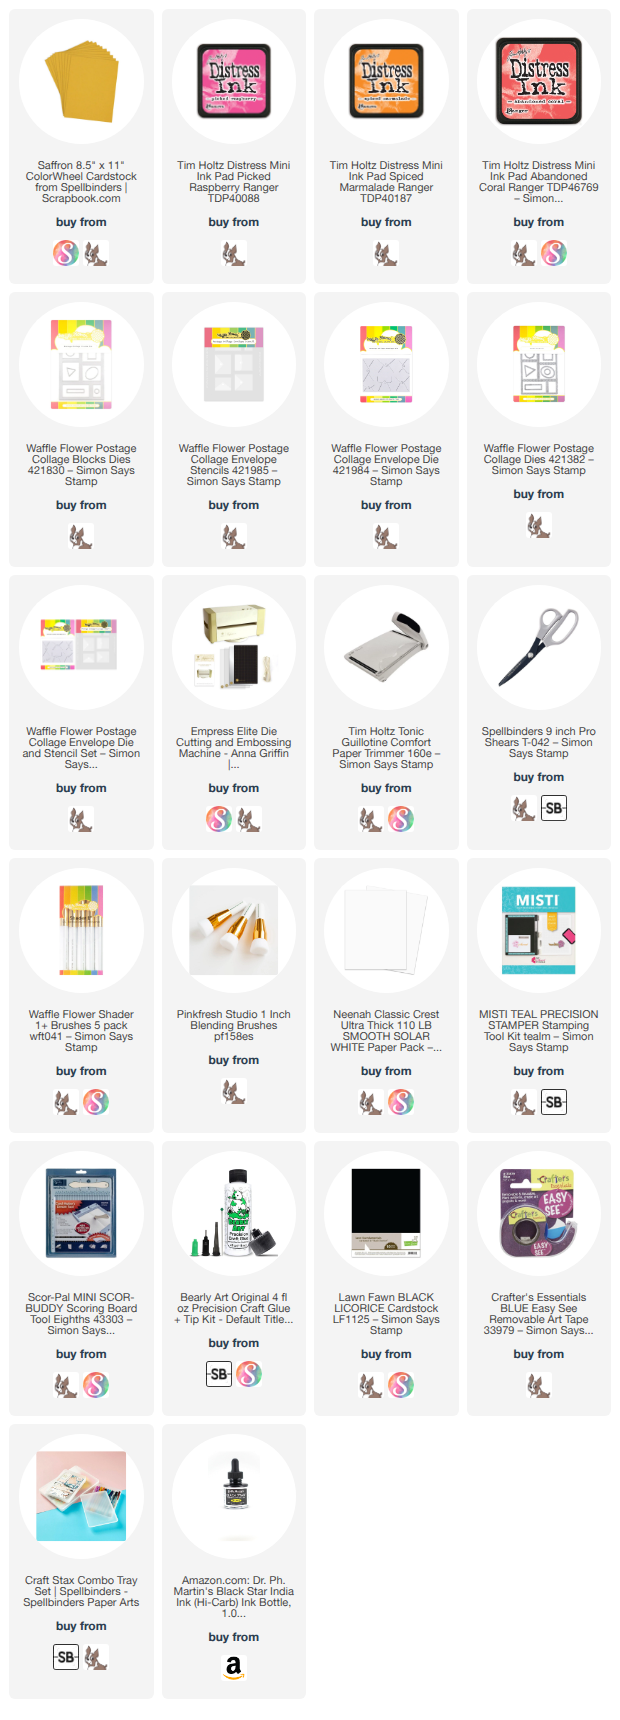
I first used the original A2 Waffle Flower Postage Collage die to cut one of the squares for behind the sentiment from Spellbinders Saffron cardstock. Next I used the Waffle Flower Envelope die to cut the diagonal lines that make the impression of envelopes on an A2 piece of Neenah cover stock. Then I used the Postage Collage Envelope stencils to ink blend on three Distress inks: Spiced Marmalade, Abandoned Coral, and Picked Raspberry. I did a very light pass for the bottom of the envelopes and a much heavier pass for the top part.
I stamped Miss You with Versa Clair black ink and cut it to perfectly fit the postage square.

I used the Postage Collage Blocks die to cut out all the envelopes. In all honesty, this ended up separating ALL the envelope tops from the bottoms, and I used washi tape on the back to join them up again to look like closed envelopes.
I splattered a piece of white cardstock with black India ink and matted it onto an A2 panel of black cardstock.
After arranging and adhering all the envelopes onto the splattered panel using foam adhesive, I added 3 butterflies cut from pearl paper from the Artful Palette die set by Simon Says Stamp.
Affiliate links are used in this post at no cost to you. This means I may receive a small commission when you click through and shop using the links I provide. This helps support me in creating and posting my crafts. Items marked with an asterisk * at first mention were provided by a store or manufacturer. Otherwise, all items were purchased by me. I do not get paid to promote any products.
For my final card to introduce the Classic Friendship stamp set* by Cathy Zielske and Simon Says Stamp in their Always There release, I pulled out my beloved Waffle Flower Postage Collage dies.
I first used the original A2 Waffle Flower Postage Collage die to cut one of the squares for behind the sentiment from Spellbinders Saffron cardstock. Next I used the Waffle Flower Envelope die to cut the diagonal lines that make the impression of envelopes on an A2 piece of Neenah cover stock. Then I used the Postage Collage Envelope stencils to ink blend on three Distress inks: Spiced Marmalade, Abandoned Coral, and Picked Raspberry. I did a very light pass for the bottom of the envelopes and a much heavier pass for the top part.
I stamped Miss You with Versa Clair black ink and cut it to perfectly fit the postage square.
I used the Postage Collage Blocks die to cut out all the envelopes. In all honesty, this ended up separating ALL the envelope tops from the bottoms, and I used washi tape on the back to join them up again to look like closed envelopes.
I splattered a piece of white cardstock with black India ink and matted it onto an A2 panel of black cardstock.
After arranging and adhering all the envelopes onto the splattered panel using foam adhesive, I added 3 butterflies cut from pearl paper from the Artful Palette die set by Simon Says Stamp.
Affiliate links are used in this post at no cost to you. This means I may receive a small commission when you click through and shop using the links I provide. This helps support me in creating and posting my crafts. Items marked with an asterisk * at first mention were provided by a store or manufacturer. Otherwise, all items were purchased by me. I do not get paid to promote any products.
If I were ever stuck on a desert island with only a select number of craft supplies, the Waffle Flower Postage Collage (PC) collection would be at the top of my list. One of the most viral stamp/die/stencil collections ever made, I never get tired of using it and trying more and more ways to combine them all.

Today’s card using the original Postage Collage A2 Die, the PC Envelope Die, the PC Envelope Stencil, the PC Collage Mini Seals Die and the original Postage Collage Stamp Set.
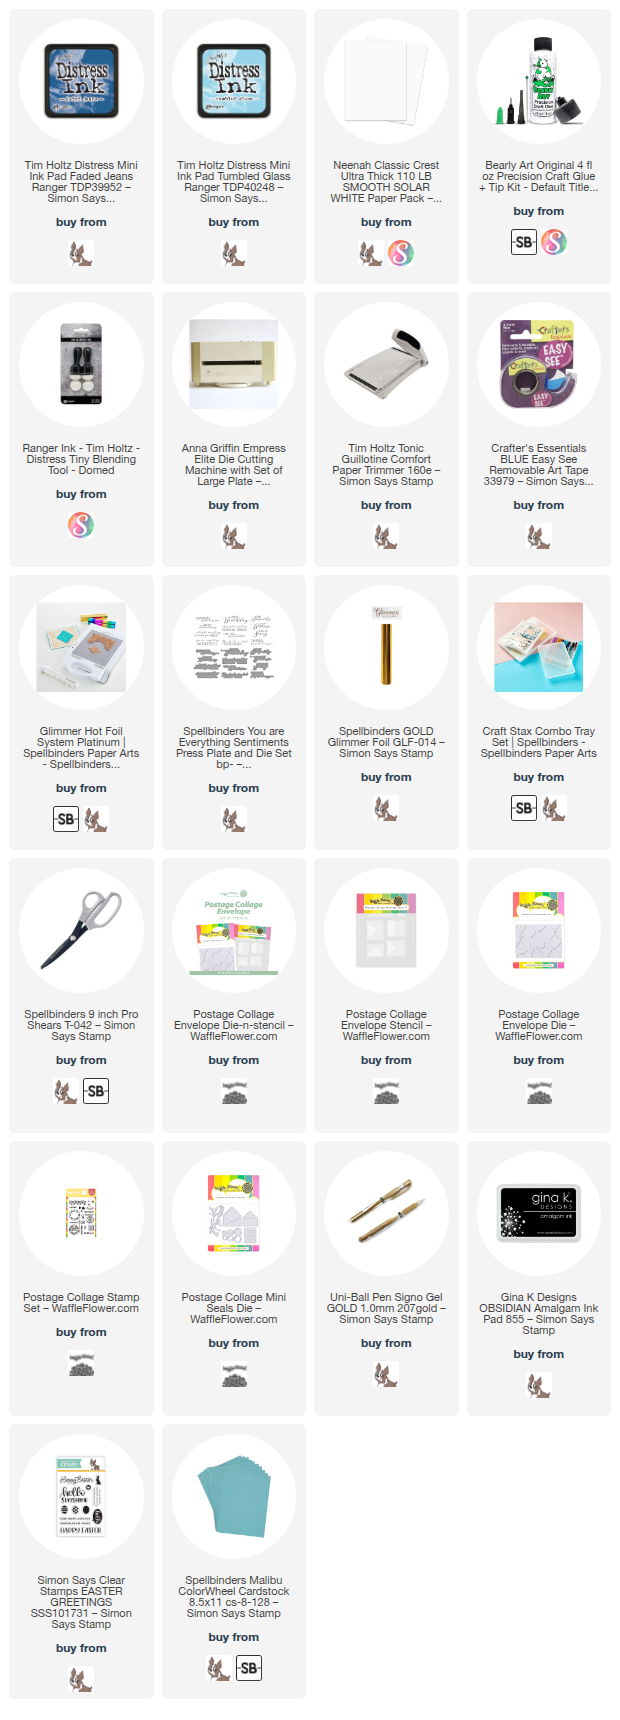
I started with the stencil and ink blended using Tim Holtz Distress Ink in Tumbled Glass and Faded Jeans, and Stampin’ Up!’s Crumb Cake ink.
I colored in the tiny hearts formed by the die with a Uni-ball Signo Gold Gel pen.

Next, I used the original Postage Collage A2 die and cut the stenciled panel to make it look like a sheet of stamps. Using Gina K’s Amalgam black inkpad, I stamped with the PC stamp set in 3 places.
Now that my background was done, I die cut an envelope, an envelope liner, a little paper note, and a tiny seal all with the PC Mini Seals die set and scraps of cardstock. I inked the edges of the letter, and I stamped a tiny little heart-circle in Versamark inside the little seal using the Simon Says Stamp Easter Greetings Stamp set (I was so happy to discover this little stamp in my stamp collection). I assembled everything as shown and added a Gold foiled Happy Birthday sentiment from the Spellbinders You Are Everything Press Plate and Die set with foam tape. I backed the panel with Stampin’ Up!’s Crumb Cake cardstock and then with Spellbinders Malibu cardstock.
Affiliate links are used in this post at no cost to you. This means I may receive a small commission when you click through and shop using the links I provide. This helps support me in creating and posting my crafts. Items marked with an asterisk * at first mention were provided by a store or manufacturer. Otherwise, all items were purchased by me. I do not get paid to promote any products.
SUPPLIES USED
If I were ever stuck on a desert island with only a select number of craft supplies, the Waffle Flower Postage Collage (PC) collection would be at the top of my list. One of the most viral stamp/die/stencil collections ever made, I never get tired of using it and trying more and more ways to combine them all.
Today’s card using the original Postage Collage A2 Die, the PC Envelope Die, the PC Envelope Stencil, the PC Collage Mini Seals Die and the original Postage Collage Stamp Set.
I started with the stencil and ink blended using Tim Holtz Distress Ink in Tumbled Glass and Faded Jeans, and Stampin’ Up!’s Crumb Cake ink.
I colored in the tiny hearts formed by the die with a Uni-ball Signo Gold Gel pen.
Next, I used the original Postage Collage A2 die and cut the stenciled panel to make it look like a sheet of stamps. Using Gina K’s Amalgam black inkpad, I stamped with the PC stamp set in 3 places.
Now that my background was done, I die cut an envelope, an envelope liner, a little paper note, and a tiny seal all with the PC Mini Seals die set and scraps of cardstock. I inked the edges of the letter, and I stamped a tiny little heart-circle in Versamark inside the little seal using the Simon Says Stamp Easter Greetings Stamp set (I was so happy to discover this little stamp in my stamp collection). I assembled everything as shown and added a Gold foiled Happy Birthday sentiment from the Spellbinders You Are Everything Press Plate and Die set with foam tape. I backed the panel with Stampin’ Up!’s Crumb Cake cardstock and then with Spellbinders Malibu cardstock.
Affiliate links are used in this post at no cost to you. This means I may receive a small commission when you click through and shop using the links I provide. This helps support me in creating and posting my crafts. Items marked with an asterisk * at first mention were provided by a store or manufacturer. Otherwise, all items were purchased by me. I do not get paid to promote any products.
SUPPLIES USED
Well, here we are after all this time. 2026 is starting off with a bang and bucket list items. I attended the 2026 Rose Parade in Pasadena, CA (lots of rain and lots of fun). And on January 19, I became a grandmother for the first time to a little baby boy. I feel like I've already had a full year!
I had fun over the past 6 weeks working on 3 different Valentine designs.
The first is a CASE of a Tammy C. Wilson card. It features a retired stamp and die set by Stampin' Up called Sweet Conversations and Sweet Hearts, respectively. I used an old woodgrain 2D Sizzix embossing folder. Ink is Wisteria Wonder, Sweet Sugarplum, and Versamark. Embossing Powder is the wonderful Brutus Monroe Alabaster. Patterned paper was also retired from Stampin' Up! The splatter pattern was made with a spatter stamp from MFT. Cardstock is SU's Wisteria Wonder, Sweet Sugarplum (both retired) and Rich Razzleberry. Embellishments are from my stash.


The next card features a Honey Bee Stamps 3D embossing folder called Spring Medley. I used Pinkfresh Studio's Shaker Hearts dies, their Breezy Blossoms stamp, die and stencil sets, and their All Kinds of Wonderful stamp and die set for the sentiment. Inks I wasn't so good about keeping up with. I know I used Concord & 9th's Nectar and Grapefruit and then I used an orangish-red ink for the darkest color. The greens are very blue-green inks such as Distress Evergreen Bough. I used my handy color wheel to pick the greens and I was not disappointed.


The last card features the super cute Simon Says Stamp die set called Mail Call along with Taylored Expression's Papaya cardstock and Stampin' Up's Pretty Peacock. The sentiment is computer generated. The background uses Waffle Flower Love Postage Collage stamps along with the original WF Postage Collage stamps, all stamped with Concord & 9th's Powder dye ink. The arch dies are Spellbinder's Essential Arches. (Can you tell how much I like the coral-teal color combos?)


I am entering the Just Add Ink Challenge, the Cut It Up challenge, and the Alphabet Challenge.
Well, here we are after all this time. 2026 is starting off with a bang and bucket list items. I attended the 2026 Rose Parade in Pasadena, CA (lots of rain and lots of fun). And on January 19, I became a grandmother for the first time to a little baby boy. I feel like I've already had a full year!
I had fun over the past 6 weeks working on 3 different Valentine designs.
The first is a CASE of a Tammy C. Wilson card. It features a retired stamp and die set by Stampin' Up called Sweet Conversations and Sweet Hearts, respectively. I used an old woodgrain 2D Sizzix embossing folder. Ink is Wisteria Wonder, Sweet Sugarplum, and Versamark. Embossing Powder is the wonderful Brutus Monroe Alabaster. Patterned paper was also retired from Stampin' Up! The splatter pattern was made with a spatter stamp from MFT. Cardstock is SU's Wisteria Wonder, Sweet Sugarplum (both retired) and Rich Razzleberry. Embellishments are from my stash.
The next card features a Honey Bee Stamps 3D embossing folder called Spring Medley. I used Pinkfresh Studio's Shaker Hearts dies, their Breezy Blossoms stamp, die and stencil sets, and their All Kinds of Wonderful stamp and die set for the sentiment. Inks I wasn't so good about keeping up with. I know I used Concord & 9th's Nectar and Grapefruit and then I used an orangish-red ink for the darkest color. The greens are very blue-green inks such as Distress Evergreen Bough. I used my handy color wheel to pick the greens and I was not disappointed.
The last card features the super cute Simon Says Stamp die set called Mail Call along with Taylored Expression's Papaya cardstock and Stampin' Up's Pretty Peacock. The sentiment is computer generated. The background uses Waffle Flower Love Postage Collage stamps along with the original WF Postage Collage stamps, all stamped with Concord & 9th's Powder dye ink. The arch dies are Spellbinder's Essential Arches. (Can you tell how much I like the coral-teal color combos?)
I am entering the Just Add Ink Challenge, the Cut It Up challenge, and the Alphabet Challenge.

