

The new Large Stitched Envelope and Postage die from Poppystamps lends itself to endless creativity. It is large enough to put things in, like this set of tulips, and small enough that you could fit 2-5 envelopes on an A2 or slimline card. The stitched edge makes it extra cute. And if that weren't cool enough, you get a fun little postage stamp die with the envelope die.


The new Large Stitched Envelope and Postage die from Poppystamps lends itself to endless creativity. It is large enough to put things in, like this set of tulips, and small enough that you could fit 2-5 envelopes on an A2 or slimline card. The stitched edge makes it extra cute. And if that weren't cool enough, you get a fun little postage stamp die with the envelope die.

There is so much to love about the new Gracious Floral set from Memory Box Open Studio. I'm a big fan of slimline cards, so I decided to create a high contrast card of mostly black and white. I used the Gracious Floral 3D Embossing Folder with Neenah Classic Crest 110lb cardstock. Here's a tip: spritz your cardstock on one or both sides with one single spritz of water just before you send it through your machine sandwiched inside the folder. This will relax the paper fibers, allowing them to bend instead of crack. Of course, if your cardstock has ink on it, just do the back only.


There is so much to love about the new Gracious Floral set from Memory Box Open Studio. I'm a big fan of slimline cards, so I decided to create a high contrast card of mostly black and white. I used the Gracious Floral 3D Embossing Folder with Neenah Classic Crest 110lb cardstock. Here's a tip: spritz your cardstock on one or both sides with one single spritz of water just before you send it through your machine sandwiched inside the folder. This will relax the paper fibers, allowing them to bend instead of crack. Of course, if your cardstock has ink on it, just do the back only.

The new Poppystamps Layered Tulips die is so much fun to work with! If you like flowers (how many cardmakers don't?) it offers so much texture and dimension. I created this colorful bouquet with some Memory Box paper and Layered Tulips.


The new Poppystamps Layered Tulips die is so much fun to work with! If you like flowers (how many cardmakers don't?) it offers so much texture and dimension. I created this colorful bouquet with some Memory Box paper and Layered Tulips.

The Rainbow Arch die from Poppystamps has a lot of flexibility. It can serve as a cool, graphic semi-circle among other things. I decided to pull out some specialty cardstock and give it a workout.

The Rainbow Arch die from Poppystamps has a lot of flexibility. It can serve as a cool, graphic semi-circle among other things. I decided to pull out some specialty cardstock and give it a workout.

Today, I'm over on the Poppystamps blog with a cute little treat holder. It's ideal for tea bags on little wrapped chocolate candies. Tea may be an overlooked gift at this time of year.


Today, I'm over on the Poppystamps blog with a cute little treat holder. It's ideal for tea bags on little wrapped chocolate candies. Tea may be an overlooked gift at this time of year.

The first time I saw the new Witches Shoe die from Poppystamps, I immediately thought of the ruby slippers from The Wizard of Oz. I didn't like that movie as a small child and I would hide behind the TV every time the witch came on TV. I figured she couldn't see me that way. Fast forward to now.


The first time I saw the new Witches Shoe die from Poppystamps, I immediately thought of the ruby slippers from The Wizard of Oz. I didn't like that movie as a small child and I would hide behind the TV every time the witch came on TV. I figured she couldn't see me that way. Fast forward to now.

While the temperatures are just barely inching down where I live (Texas), I'm in full-on fall and Halloween mode with my crafting. Poppystamps latest release is ideal for cards, scrapbook pages, and treat bags too. I started my little ghostly tag using an olive green from Tim Holtz Kraft Stock Stack in Cool. I cut it into a tag shape that is about 3" x 6". Next, I found the ideal fall plaid paper in my Memory Box Woodsy Plaid 6 x 6 Paper Pad. I had a special blade on my Creative Memories paper trimmer so I cut one piece with a scallop edge and adhered that to the top of the tag. I sanded the green tag with a sanding block to reveal the kraft cardstock below the color.

I hope you're taking some time for some autumn or almost-autumn crafting today. You deserve it.
While the temperatures are just barely inching down where I live (Texas), I'm in full-on fall and Halloween mode with my crafting. Poppystamps latest release is ideal for cards, scrapbook pages, and treat bags too. I started my little ghostly tag using an olive green from Tim Holtz Kraft Stock Stack in Cool. I cut it into a tag shape that is about 3" x 6". Next, I found the ideal fall plaid paper in my Memory Box Woodsy Plaid 6 x 6 Paper Pad. I had a special blade on my Creative Memories paper trimmer so I cut one piece with a scallop edge and adhered that to the top of the tag. I sanded the green tag with a sanding block to reveal the kraft cardstock below the color.
I hope you're taking some time for some autumn or almost-autumn crafting today. You deserve it.

I love autumn and Halloween and almost everything that goes with them (with the possible exception of gory slasher movies). So when I received the 2022 Poppystamps Halloween release in the mail, I was thrilled to see so many autumn and Halloween dies. What caught my eye first was the Twisted Houses die set. One die cuts out four houses. I immediately had the idea for this haunted neighborhood spread out over a slimline card.
I started with the flatter side of a piece of Arches watercolor paper. I put four drops of Stampin’ Up!’s Smoky Slate reinker into a tiny Ranger mister along with some water. I spritzed the paper several times and dried with a heat tool. I punched a 2” circle from Gina K designs masking paper. I put it down to serve as my moon and then using foam blenders (1 per color), I blended Distress Oxides in Scattered Straw, Wild Honey, Spiced Marmalade, Seedless Preserves, Chipped Sapphire and Black Soot to create the night sky. I removed the mask and gently inked the edge of the moon with a dab of Scattered Straw Distress Oxide. I replaced the mask and spritzed and splattered the page with water, dabbing up the water and drying it to make it look spotty. Finally, I cut the piece to 8.25” x 3.25” and mounted it to a cardbase made of Stampin’ Up!’s Concord Crush. My background was done.
- Twisted Houses NEW
- Cabin Snowglobe Pop Up Easel Set (bare trees)
- Snowman and Trees (more trees)
- Cottage Globe (fence)
- Pile of Pumpkins
- Boo Poe Script NEW
- Whittle Creatures (ghost) NEW

I love autumn and Halloween and almost everything that goes with them (with the possible exception of gory slasher movies). So when I received the 2022 Poppystamps Halloween release in the mail, I was thrilled to see so many autumn and Halloween dies. What caught my eye first was the Twisted Houses die set. One die cuts out four houses. I immediately had the idea for this haunted neighborhood spread out over a slimline card.
I started with the flatter side of a piece of Arches watercolor paper. I put four drops of Stampin’ Up!’s Smoky Slate reinker into a tiny Ranger mister along with some water. I spritzed the paper several times and dried with a heat tool. I punched a 2” circle from Gina K designs masking paper. I put it down to serve as my moon and then using foam blenders (1 per color), I blended Distress Oxides in Scattered Straw, Wild Honey, Spiced Marmalade, Seedless Preserves, Chipped Sapphire and Black Soot to create the night sky. I removed the mask and gently inked the edge of the moon with a dab of Scattered Straw Distress Oxide. I replaced the mask and spritzed and splattered the page with water, dabbing up the water and drying it to make it look spotty. Finally, I cut the piece to 8.25” x 3.25” and mounted it to a cardbase made of Stampin’ Up!’s Concord Crush. My background was done.
- Twisted Houses NEW
- Cabin Snowglobe Pop Up Easel Set (bare trees)
- Snowman and Trees (more trees)
- Cottage Globe (fence)
- Pile of Pumpkins
- Boo Poe Script NEW
- Whittle Creatures (ghost) NEW

Hello, indeed! I'm over on the Poppystamps blog today with a challenge reminder about their monthly challenge. This month the challenge is to use pretty papers.

Hello, indeed! I'm over on the Poppystamps blog today with a challenge reminder about their monthly challenge. This month the challenge is to use pretty papers.

It's not too late to enter the Poppystamps March Challenge with the theme of Pretty Papers. I used five different types of specialty paper and cardstock to make this shamrock card. I started with Poppystamps Whittle Hearts die set to cut three large hearts from a sheet of Memory Box Lush Green 6x6 paper pad. Then I used the smaller heart in that set to cut three hearts from the Memory Box Festive 6x6 glitter pad.

I needed a stem, next. I could have hand cut this, but I thought of a way to get a nice curved stem. I nested two dies from the Poppystamps Basic Ovals die set and taped them together before I ran it through my Big Kick.

It's not too late to enter the Poppystamps March Challenge with the theme of Pretty Papers. I used five different types of specialty paper and cardstock to make this shamrock card. I started with Poppystamps Whittle Hearts die set to cut three large hearts from a sheet of Memory Box Lush Green 6x6 paper pad. Then I used the smaller heart in that set to cut three hearts from the Memory Box Festive 6x6 glitter pad.
I needed a stem, next. I could have hand cut this, but I thought of a way to get a nice curved stem. I nested two dies from the Poppystamps Basic Ovals die set and taped them together before I ran it through my Big Kick.

I just love the My Favorite Things Roses All Over stamp. It's elegant and so very flexible. I decided to enter the MFT Weekly Sketch Challenge #583 (#MFTWSC583) with it. I heat embossed the image with white embossing powder onto watercolor paper and then watercolored four different squares with my Zig Clean Color Real Brush Markers to have them represent the four seasons.

I just love the My Favorite Things Roses All Over stamp. It's elegant and so very flexible. I decided to enter the MFT Weekly Sketch Challenge #583 (#MFTWSC583) with it. I heat embossed the image with white embossing powder onto watercolor paper and then watercolored four different squares with my Zig Clean Color Real Brush Markers to have them represent the four seasons.

Does your family like leftovers? My husband and I do. Leftovers can often be even better in cardmaking than in the fridge. I had made a colorful watercolored tag with Tim Holtz Distress Ink Picked Raspberry, Abandoned Coral and Spiced Marmalade. As Tim has taught over and over, when you have leftover ink on your glass mat, mist it with water and pick it up on a piece of watercolor paper. I did just that.

Later I used this same piece to test out a glimmery spray I had. This made this little 4x6 piece of cardstock ideal to try out my new Sizzix Garden Greens dies. I was making this card for several different card challenges that called for dies. I also used the dies to cut Neenah 110lb Solar White cardstock, Stampin' Up!'s Pink Pirouette and Calypso Coral cardstock, and Memory Box metallic gold cardstock from their 6x6 Rainbow Reflections Mirror Pad. I die cut one of the Paper Roses Stitched Rectangle dies from white cardstock and a Stampin' Up! circle from their Stitched Shapes dies.
I also used Calypso Coral to cut out Wishes from Spellbinders Simply Perfect Mix & Match Sentiments. And I used the word Best from Tim Holtz Metallic Quotation Stickers. Before I adhered everything down, I splattered the rectangle with a watercolor brush dipped in Stampin' Up!'s Flirty Flamingo ink mixed with water. Sometimes my splatters turn out disastrously, but this didn't.
I'm entering this into the Simon Says Stamp Wednesday Challenge to use a die cut (hah, I used 12!) and the Little Red Wagon Challenge #643 and the Fab 'n Funky Challenge #546.
Does your family like leftovers? My husband and I do. Leftovers can often be even better in cardmaking than in the fridge. I had made a colorful watercolored tag with Tim Holtz Distress Ink Picked Raspberry, Abandoned Coral and Spiced Marmalade. As Tim has taught over and over, when you have leftover ink on your glass mat, mist it with water and pick it up on a piece of watercolor paper. I did just that.
Later I used this same piece to test out a glimmery spray I had. This made this little 4x6 piece of cardstock ideal to try out my new Sizzix Garden Greens dies. I was making this card for several different card challenges that called for dies. I also used the dies to cut Neenah 110lb Solar White cardstock, Stampin' Up!'s Pink Pirouette and Calypso Coral cardstock, and Memory Box metallic gold cardstock from their 6x6 Rainbow Reflections Mirror Pad. I die cut one of the Paper Roses Stitched Rectangle dies from white cardstock and a Stampin' Up! circle from their Stitched Shapes dies.
I also used Calypso Coral to cut out Wishes from Spellbinders Simply Perfect Mix & Match Sentiments. And I used the word Best from Tim Holtz Metallic Quotation Stickers. Before I adhered everything down, I splattered the rectangle with a watercolor brush dipped in Stampin' Up!'s Flirty Flamingo ink mixed with water. Sometimes my splatters turn out disastrously, but this didn't.
I'm entering this into the Simon Says Stamp Wednesday Challenge to use a die cut (hah, I used 12!) and the Little Red Wagon Challenge #643 and the Fab 'n Funky Challenge #546.

I'm over on the Poppystamps blog today with this sweet slimline card featuring their Whittle Rainbow Unicorn die kit. It comes with two unicorns, clouds, a rainbow, stars, a moon and a heart. Basically, if Lucky Charms was a die kit, this would be it. It also includes a small set of sentiment stamps.

I love slimline cards and made this into one with three circular windows. I chose 3 pieces of blue cardstock for the sky backgrounds and punched out one 2.5" circle from each of them. Next I used almost all the dies in the kit to cut a variety of shapes. I also cut out 1 rainbow in toned-down rainbow shades of cardstock. The rainbow die simply cuts 6 rainbow shaped stripes, so there is still a need to glue the stripes down side by side to either your main card, or to another piece of small cardstock. I chose to glue them on to a scrap piece. Then I promptly cut it in half to use in two of the three windows.
I used the panel with the three circle windows to guide me in what I put where. I glued the background "scenes" directly onto the blue circles. Next, I glued the foreground pieces, onto the front of the white panel. I used glitter paper for my unicorn wings and horns. The manes I colored with a pale purple Spectrum Noir marker. Finally, I used foam adhesive to pop up the front panel onto the decorated card. My last move was to heat emboss the sentiment onto black cardstock with white embossing powder and glue it to the card front.
I want to give a special shout out to #VistaCreate. I was able to create my watermark using a font I uploaded, and get a transparent background, all without having to pay any subscription fee.
Ingredients:
CS: Neenah Classic Crest Solar White 110lb, Black cardstock, Recollections 65lb, Memory Box 6x6" paper pads for all other colored cardstock and glitter cardstock
Dies & Stamps: All from Poppystamps Whittle Rainbow Unicorn Kit
Marker: Spectrum Noir TriBlend Hydrangea - lightest shade
Ink: Ranger Embossing Ink
Embossing powder: Taylored Expressions Detail White Embossing Powder
I'm over on the Poppystamps blog today with this sweet slimline card featuring their Whittle Rainbow Unicorn die kit. It comes with two unicorns, clouds, a rainbow, stars, a moon and a heart. Basically, if Lucky Charms was a die kit, this would be it. It also includes a small set of sentiment stamps.
I love slimline cards and made this into one with three circular windows. I chose 3 pieces of blue cardstock for the sky backgrounds and punched out one 2.5" circle from each of them. Next I used almost all the dies in the kit to cut a variety of shapes. I also cut out 1 rainbow in toned-down rainbow shades of cardstock. The rainbow die simply cuts 6 rainbow shaped stripes, so there is still a need to glue the stripes down side by side to either your main card, or to another piece of small cardstock. I chose to glue them on to a scrap piece. Then I promptly cut it in half to use in two of the three windows.
I used the panel with the three circle windows to guide me in what I put where. I glued the background "scenes" directly onto the blue circles. Next, I glued the foreground pieces, onto the front of the white panel. I used glitter paper for my unicorn wings and horns. The manes I colored with a pale purple Spectrum Noir marker. Finally, I used foam adhesive to pop up the front panel onto the decorated card. My last move was to heat emboss the sentiment onto black cardstock with white embossing powder and glue it to the card front.
I want to give a special shout out to #VistaCreate. I was able to create my watermark using a font I uploaded, and get a transparent background, all without having to pay any subscription fee.
Ingredients:
CS: Neenah Classic Crest Solar White 110lb, Black cardstock, Recollections 65lb, Memory Box 6x6" paper pads for all other colored cardstock and glitter cardstock
Dies & Stamps: All from Poppystamps Whittle Rainbow Unicorn Kit
Marker: Spectrum Noir TriBlend Hydrangea - lightest shade
Ink: Ranger Embossing Ink
Embossing powder: Taylored Expressions Detail White Embossing Powder


I'm on the Poppystamps blog today with this cute unicorn cards. The latest releases are here and I used both unicorn sets. The happy unicorn is large, measuring 4" x 4" when put together. Of course, this big guy can be cut from brown and/or black paper and turned into a horse. The wings and horn are separate dies in this set and can be left off if you like. Make a whole stable of horses and put them at the bottom of a scrapbook page.

I'm on the Poppystamps blog today with this cute unicorn cards. The latest releases are here and I used both unicorn sets. The happy unicorn is large, measuring 4" x 4" when put together. Of course, this big guy can be cut from brown and/or black paper and turned into a horse. The wings and horn are separate dies in this set and can be left off if you like. Make a whole stable of horses and put them at the bottom of a scrapbook page.

I'm on the Poppystamps blog today with this little hungry critter. Who knew a birthday card could be so tasty? I guess the Whittle Beaver did. I wanted to use a lot of white on this card to make the colors, textures and shapes really pop.

I'm on the Poppystamps blog today with this little hungry critter. Who knew a birthday card could be so tasty? I guess the Whittle Beaver did. I wanted to use a lot of white on this card to make the colors, textures and shapes really pop.

It's about time for me to start wrapping presents. Pretty, fun gift tags can give a lot of oomph to otherwise plain packages or simple gift bags. I'm on the Poppystamps blog today with these three tags. All three have the sweet figure from the Whittle Friendly Snowman die. I cut scarves and hat bands from red, aqua glitter, and a pool-colored cardstock to give them all a different look.

After that I branched out (pardon the pun). The snowman on the left got a dotted aqua paper as a hill. Then she got two trees from their Evergreen Trio die set. Finally, I added clear Fairy Drops (I can't get enough of these things) to appear like snow (or maybe sleet).

The red-scarved snowman got a black and red check hill to rest on. Then he got the sweet holly leaves and berries from the another die set. The last snowman got same glitter as a hill, and the evergreen boughs from the yet another die set. I colored the boughs with a white gel pen to make it look like snow. I added some gems as snowflakes when I was finished. A little string on the top and these sweet guys and girls are ready to go under the tree.
Do you make your own gift tags or packaging? It's like another gift under the tree. Happy holidays.
It's about time for me to start wrapping presents. Pretty, fun gift tags can give a lot of oomph to otherwise plain packages or simple gift bags. I'm on the Poppystamps blog today with these three tags. All three have the sweet figure from the Whittle Friendly Snowman die. I cut scarves and hat bands from red, aqua glitter, and a pool-colored cardstock to give them all a different look.
After that I branched out (pardon the pun). The snowman on the left got a dotted aqua paper as a hill. Then she got two trees from their Evergreen Trio die set. Finally, I added clear Fairy Drops (I can't get enough of these things) to appear like snow (or maybe sleet).
The red-scarved snowman got a black and red check hill to rest on. Then he got the sweet holly leaves and berries from the another die set. The last snowman got same glitter as a hill, and the evergreen boughs from the yet another die set. I colored the boughs with a white gel pen to make it look like snow. I added some gems as snowflakes when I was finished. A little string on the top and these sweet guys and girls are ready to go under the tree.
Do you make your own gift tags or packaging? It's like another gift under the tree. Happy holidays.

I'm a big fan of the farmhouse look, the rustic charm characterized by simple materials and a good amount of white space. Visit any craft store, furniture store, or my living room and you'll see how popular it is. At Christmas, this style means buffalo plaid, wicker or wire baskets, unvarnished wood, bottle brush trees, and more plaid.

Today, I am over on the Poppystamps blog with this farmhouse-styled card. With some black and red check paper in my stash, I started working on a farmhouse Christmas card. I used the Double Joy Die set and cut the background from the check paper. Woodgrain Kraft Paper was the perfect choice to create the outline. It *really* looks like wood. I wanted to set this off from the background but still use a woodgrain background, so I reached for the same paper but in the Cream color (also comes in white). Then I wanted to add something below the O to give it some texture and softness. I used the holly leaves and berries from another die set. I finished off the card by layering kraft paper, red paper and yep, more plaid beneath that. I was very happy with how it turned out and it was easy to make.
Ingredients:
CS: Poppystamps Woodgrain Paper in Kraft and Cream, Stampin' Up! Real Red, Very Vanilla (card base only) and Crumb Cake, Memory Box Lush Green 6x6 Paper Pack,
Patterned Paper: Memory Box Woodsy Plaid 6x6 pack (brown plaid), Red and black check by The Paper Studio from Hobby Lobby
Dies: Poppystamps Cabin Snowglobe Pop Up Easel Card Die Set, Double Joy Die Set
I'm a big fan of the farmhouse look, the rustic charm characterized by simple materials and a good amount of white space. Visit any craft store, furniture store, or my living room and you'll see how popular it is. At Christmas, this style means buffalo plaid, wicker or wire baskets, unvarnished wood, bottle brush trees, and more plaid.
Today, I am over on the Poppystamps blog with this farmhouse-styled card. With some black and red check paper in my stash, I started working on a farmhouse Christmas card. I used the Double Joy Die set and cut the background from the check paper. Woodgrain Kraft Paper was the perfect choice to create the outline. It *really* looks like wood. I wanted to set this off from the background but still use a woodgrain background, so I reached for the same paper but in the Cream color (also comes in white). Then I wanted to add something below the O to give it some texture and softness. I used the holly leaves and berries from another die set. I finished off the card by layering kraft paper, red paper and yep, more plaid beneath that. I was very happy with how it turned out and it was easy to make.
Ingredients:
CS: Poppystamps Woodgrain Paper in Kraft and Cream, Stampin' Up! Real Red, Very Vanilla (card base only) and Crumb Cake, Memory Box Lush Green 6x6 Paper Pack,
Patterned Paper: Memory Box Woodsy Plaid 6x6 pack (brown plaid), Red and black check by The Paper Studio from Hobby Lobby
Dies: Poppystamps Cabin Snowglobe Pop Up Easel Card Die Set, Double Joy Die Set
I was so excited to be chosen as the Featured Artist over on the As You See It Challenge two weeks ago. It's a super fun challenge blog with an extremely talented design team. This week's challenge is a recipe challenge. I have never done one of those before but I really like having to include a variety of different things into my card design. It's like the paper version of the TV show 'Chopped.'
This week the challenge is titled Recipe to Celebrate Neutrality. Your mission is to use a one-word sentiment, an embossing folder, ribbon or twine, a punch or die, and a neutral palette. Since I'm fully into Christmas crafting right now, I had an idea for a forest and it was going to check all the boxes.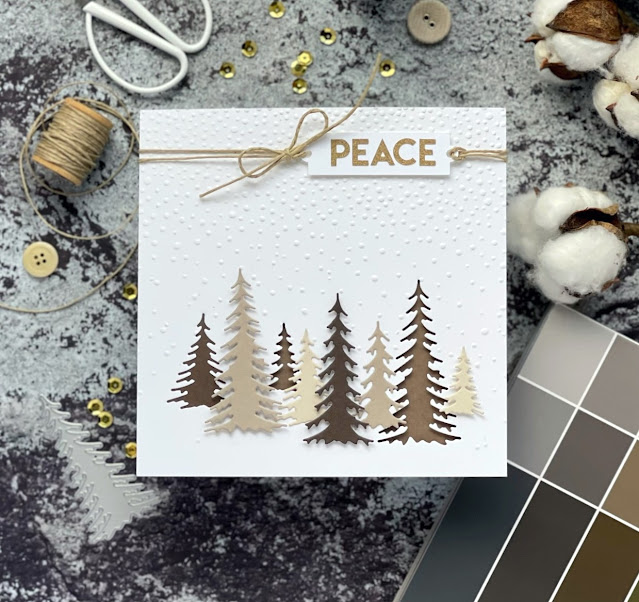
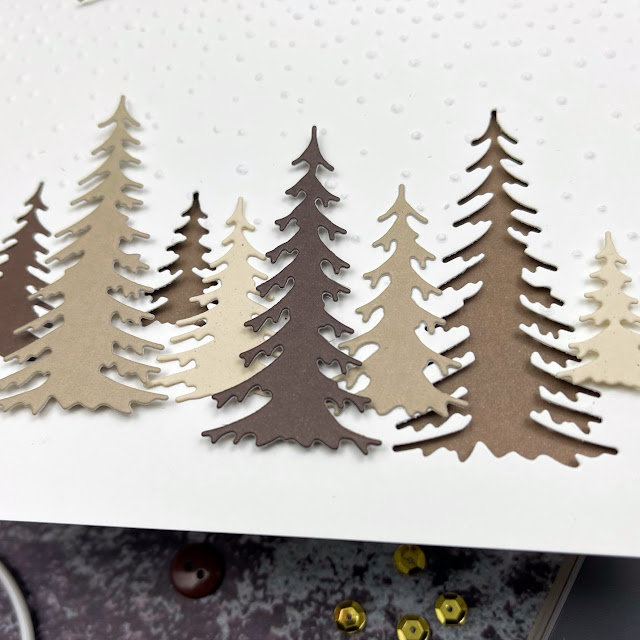

I was so excited to be chosen as the Featured Artist over on the As You See It Challenge two weeks ago. It's a super fun challenge blog with an extremely talented design team. This week's challenge is a recipe challenge. I have never done one of those before but I really like having to include a variety of different things into my card design. It's like the paper version of the TV show 'Chopped.'
This week the challenge is titled Recipe to Celebrate Neutrality. Your mission is to use a one-word sentiment, an embossing folder, ribbon or twine, a punch or die, and a neutral palette. Since I'm fully into Christmas crafting right now, I had an idea for a forest and it was going to check all the boxes.
How could I resist combining a snowglobe with a gingerbread house? Two sets of Poppystamp dies helped me create this sweet scene, featured on their blog on November 12. I started with the cottage and cut it from 4 different colors of cardstocks: red, white glitter, Stampin' Up! Baked Brown Sugar to represent gingerbread, and two from yellow. I trimmed the door off the honey-brown one. I cut another cottage from red paper and snipped off the door to use.

I loved the idea of having a window in the door and was thrilled to see that I could put the red door upside down onto the cottage die and cut a window out of the door (yes, tweezers and reading glasses were critical for this).

I went over the door with a clear glitter pen. I used the window inlays from my two yellow cottages and inset them into the honey-brown cottage and the red door. Before I added the frosted roof, I used a white gel pen to doodle on the cottage, making it look like icing. Once the cottage was complete, the rest was easier. I die cut the fence and the tree from the same honey-brown cardstock and used my white gel pen to add snow. I cut two snow mounds from the snow die that came with the Cottage Globe die, one from white cardstock, the other from glitter cardstock.
How could I resist combining a snowglobe with a gingerbread house? Two sets of Poppystamp dies helped me create this sweet scene, featured on their blog on November 12. I started with the cottage and cut it from 4 different colors of cardstocks: red, white glitter, Stampin' Up! Baked Brown Sugar to represent gingerbread, and two from yellow. I trimmed the door off the honey-brown one. I cut another cottage from red paper and snipped off the door to use.
I loved the idea of having a window in the door and was thrilled to see that I could put the red door upside down onto the cottage die and cut a window out of the door (yes, tweezers and reading glasses were critical for this).
I went over the door with a clear glitter pen. I used the window inlays from my two yellow cottages and inset them into the honey-brown cottage and the red door. Before I added the frosted roof, I used a white gel pen to doodle on the cottage, making it look like icing. Once the cottage was complete, the rest was easier. I die cut the fence and the tree from the same honey-brown cardstock and used my white gel pen to add snow. I cut two snow mounds from the snow die that came with the Cottage Globe die, one from white cardstock, the other from glitter cardstock.


