

Ever since my grandson was born in January, cute is the name of the game.
When I saw the adorable little pancake stack and spatula from The Divorce Upside stamp set* - part of the new Simon Says Stamp Shine On release - I just knew I wanted them all over something. I decided to make a happy birthday card. Since berries go with pancakes, I chose Spellbinders Wild Berry Colorwheel Cardstock for my accent color.

I took a piece of Spellbinders Chiffon cardstock from my stash and using the Hero Arts Inks Cup o Joe and Espresso (coffee and pancakes!?! does it get any better?) I stamped all over an A2 panel with these two cute, little stamps.
Next, I die cut a piece of Spellbinders Wild Berry cardstock, and the panel I had just stamped with 2 stitched rectangle dies from the Nested Postage Labels and Tag die set from Spellbinders. I layered the three pieces I was left with together and glued them in place.
Then I die cut the Bouncy Happy Birthday die from Simon Says Stamp from the berry cardstock. I cut 2 additional sentiments from the same Chiffon cardstock and glued all three together to give the sentiment some real dimension. I glued this on the top panel, and added some small beige gems around the sentiment for a finishing touch.
Affiliate links are used in this post at no cost to you. This means I may receive a small commission when you click through and shop using the links I provide. This helps support me in creating and posting my crafts. Items marked with an asterisk * at first mention were provided by a store or manufacturer. Otherwise, all items were purchased by me.
Ever since my grandson was born in January, cute is the name of the game.
When I saw the adorable little pancake stack and spatula from The Divorce Upside stamp set* - part of the new Simon Says Stamp Shine On release - I just knew I wanted them all over something. I decided to make a happy birthday card. Since berries go with pancakes, I chose Spellbinders Wild Berry Colorwheel Cardstock for my accent color.
I took a piece of Spellbinders Chiffon cardstock from my stash and using the Hero Arts Inks Cup o Joe and Espresso (coffee and pancakes!?! does it get any better?) I stamped all over an A2 panel with these two cute, little stamps.
Next, I die cut a piece of Spellbinders Wild Berry cardstock, and the panel I had just stamped with 2 stitched rectangle dies from the Nested Postage Labels and Tag die set from Spellbinders. I layered the three pieces I was left with together and glued them in place.
Then I die cut the Bouncy Happy Birthday die from Simon Says Stamp from the berry cardstock. I cut 2 additional sentiments from the same Chiffon cardstock and glued all three together to give the sentiment some real dimension. I glued this on the top panel, and added some small beige gems around the sentiment for a finishing touch.
Affiliate links are used in this post at no cost to you. This means I may receive a small commission when you click through and shop using the links I provide. This helps support me in creating and posting my crafts. Items marked with an asterisk * at first mention were provided by a store or manufacturer. Otherwise, all items were purchased by me.

I love a good twist. When I received The Divorce Upside stamp set* from Simon Says Stamp as part of the new Shine On release, I thought I’d give one of the sentiments a twist.
I took the “hello, freedom” stamp and turned it into a 4th of July card. I used a set of nested star dies to cut stars from red patterned paper from my stash, red metallic paper and white pearlescent paper from Memory Box. I took a piece of blue and white striped paper from my stash and cut it to about 4” x 3”. I cut it diagonally with my paper trimmer and spread the 2 pieces apart and adhered them to a piece of white cardstock that was approximately 4” x 5.25”. I stamped the sentiment diagonally in black Versafine in the white space between the 2 pieces of striped paper, making sure it was parallel to the paper edges.

To make this panel a real focal point, I die cut it with one of the dies from the Spellbinders Nested Postage Labels and Tag die set. This made it a little smaller and gave it that nice stitched edge I am so fond of. Next, I adhered this to a white A2 card front. Finally, I adhered the stars all over with glue and foam adhesive. It was a pretty simple card to make.
Affiliate links are used in this post at no cost to you. This means I may receive a small commission when you click through and shop using the links I provide. This helps support me in creating and posting my crafts. Items marked with an asterisk * at first mention were provided by a store or manufacturer. Otherwise, all items were purchased by me.
I love a good twist. When I received The Divorce Upside stamp set* from Simon Says Stamp as part of the new Shine On release, I thought I’d give one of the sentiments a twist.
I took the “hello, freedom” stamp and turned it into a 4th of July card. I used a set of nested star dies to cut stars from red patterned paper from my stash, red metallic paper and white pearlescent paper from Memory Box. I took a piece of blue and white striped paper from my stash and cut it to about 4” x 3”. I cut it diagonally with my paper trimmer and spread the 2 pieces apart and adhered them to a piece of white cardstock that was approximately 4” x 5.25”. I stamped the sentiment diagonally in black Versafine in the white space between the 2 pieces of striped paper, making sure it was parallel to the paper edges.
To make this panel a real focal point, I die cut it with one of the dies from the Spellbinders Nested Postage Labels and Tag die set. This made it a little smaller and gave it that nice stitched edge I am so fond of. Next, I adhered this to a white A2 card front. Finally, I adhered the stars all over with glue and foam adhesive. It was a pretty simple card to make.
Affiliate links are used in this post at no cost to you. This means I may receive a small commission when you click through and shop using the links I provide. This helps support me in creating and posting my crafts. Items marked with an asterisk * at first mention were provided by a store or manufacturer. Otherwise, all items were purchased by me.
I made this cute little tag set to introduce the Classic Friendship stamp set*, designed by Cathy Zielske for the Always There release by Simon Says Stamp. Talk about a real go-to stamp set, this set has everything you need for any occasion. From a simple ‘Hey There’ to a humorous ‘you get my kind of weird,’ to a sweet ‘hey, buddy’ (I’m thinking of my grandson with that last one), this set has a clean and simple look that fits any card style or size.

I would end up using the Simon Says Stamp Festive Tags die set for all 4 tags. I cut 1 from heat-resistant acetate. I think this tag set was recently retired from the store, but something like the two sets I've linked below (or any tag die) would work perfectly.
First, on all my heat embossing, I generously dust the surface with an anti-static powder. Mine is a no-name tool a friend gifted me years ago, but I can recommend the Simon Says Stamp Brush Powder Tool. On the heat resistant acetate I used Versamark to stamp ‘Hey Friend,’ and then closer to the bottom ‘I’m always here for you’ using Brutus Monroe’s Alabaster embossing powder. I added a little heart cut from Memory Box Rainbow Reflections 6x6 paper pad, and the Artful Palette die set and glued it onto the corner of the acetate tag.
I took Distress Watercolor Paper and used the smooth side to dip into Tim Holtz Distress Spray Stain in Salty Ocean, Salvaged Patina, Shabby Shutters, and Squeezed Lemonade with his Tonic Media Surface Mat (the mat makes the wet media bead up and create great little dots of color when you absorb it with paper). I dried between layers to get some depth. I went very heavy on the Salvaged Patina and Salty Ocean because I wanted a deeply colored background to make the white embossing stand out. I cut out my favorite part with the same tag die. I used embossed ‘you’re always there for me’ in white.

For the 3rd tag, I used a stamp set I have been itching to have for years and finally bought - Tiny Prints from Tim Holtz and Stampers Anonymous. I used my Distress Mini ink cubes in Salvaged Patina and Salty Ocean and inked the stamp multiple times to get a vivid impression onto Neenah Classic Crest 110 cover stock. I cut out my favorite bit with the tag die. I stamped the ‘always remember that’ with Lakefront ink from Concord & 9th onto a scrap piece of white, and cut it out with the Honey Bee Stamps Mini Messages Banners die set and attached it with foam adhesive.
For the last tag, I used Spellbinders Teal Topaz Colorwheel cardstock to cut out the fourth tag. Then I took the tag and dry embossed it with the Simon Says Stamp Embossing Folder Tiny Tufts. I then took my favorite white pigment ink, Sugar Cube by Taylored Expressions, and swiped it across the raised portions of the dry embossing. I love this effect.
I used one of the hole reinforcer dies that comes with the Festive Tags die set to cut the little piece from lime green polka-dotted paper and glued it over the watercolor tag. I tied the set together with a blue grosgrain ribbon and lime green twine and blue and white bakers twine.
Affiliate links are used in this post at no cost to you. This means I may receive a small commission when you click through and shop using the links I provide. This helps support me in creating and posting my crafts. Items marked with an asterisk * at first mention were provided by a store or manufacturer. Otherwise, all items were purchased by me. I do not get paid to promote any products.
I made this cute little tag set to introduce the Classic Friendship stamp set*, designed by Cathy Zielske for the Always There release by Simon Says Stamp. Talk about a real go-to stamp set, this set has everything you need for any occasion. From a simple ‘Hey There’ to a humorous ‘you get my kind of weird,’ to a sweet ‘hey, buddy’ (I’m thinking of my grandson with that last one), this set has a clean and simple look that fits any card style or size.
I would end up using the Simon Says Stamp Festive Tags die set for all 4 tags. I cut 1 from heat-resistant acetate. I think this tag set was recently retired from the store, but something like the two sets I've linked below (or any tag die) would work perfectly.
First, on all my heat embossing, I generously dust the surface with an anti-static powder. Mine is a no-name tool a friend gifted me years ago, but I can recommend the Simon Says Stamp Brush Powder Tool. On the heat resistant acetate I used Versamark to stamp ‘Hey Friend,’ and then closer to the bottom ‘I’m always here for you’ using Brutus Monroe’s Alabaster embossing powder. I added a little heart cut from Memory Box Rainbow Reflections 6x6 paper pad, and the Artful Palette die set and glued it onto the corner of the acetate tag.
I took Distress Watercolor Paper and used the smooth side to dip into Tim Holtz Distress Spray Stain in Salty Ocean, Salvaged Patina, Shabby Shutters, and Squeezed Lemonade with his Tonic Media Surface Mat (the mat makes the wet media bead up and create great little dots of color when you absorb it with paper). I dried between layers to get some depth. I went very heavy on the Salvaged Patina and Salty Ocean because I wanted a deeply colored background to make the white embossing stand out. I cut out my favorite part with the same tag die. I used embossed ‘you’re always there for me’ in white.
For the 3rd tag, I used a stamp set I have been itching to have for years and finally bought - Tiny Prints from Tim Holtz and Stampers Anonymous. I used my Distress Mini ink cubes in Salvaged Patina and Salty Ocean and inked the stamp multiple times to get a vivid impression onto Neenah Classic Crest 110 cover stock. I cut out my favorite bit with the tag die. I stamped the ‘always remember that’ with Lakefront ink from Concord & 9th onto a scrap piece of white, and cut it out with the Honey Bee Stamps Mini Messages Banners die set and attached it with foam adhesive.
For the last tag, I used Spellbinders Teal Topaz Colorwheel cardstock to cut out the fourth tag. Then I took the tag and dry embossed it with the Simon Says Stamp Embossing Folder Tiny Tufts. I then took my favorite white pigment ink, Sugar Cube by Taylored Expressions, and swiped it across the raised portions of the dry embossing. I love this effect.
I used one of the hole reinforcer dies that comes with the Festive Tags die set to cut the little piece from lime green polka-dotted paper and glued it over the watercolor tag. I tied the set together with a blue grosgrain ribbon and lime green twine and blue and white bakers twine.
Affiliate links are used in this post at no cost to you. This means I may receive a small commission when you click through and shop using the links I provide. This helps support me in creating and posting my crafts. Items marked with an asterisk * at first mention were provided by a store or manufacturer. Otherwise, all items were purchased by me. I do not get paid to promote any products.

One of the nicest things about the new Classic Friendship stamp set* by Cathy Zielske is how there are sentiments not only for any occasion, but for so many different size spaces. I decided to put together a card using both the Simon Says Stamp Artful Palette dies and templates, and the Tim Holtz idea-ology Backdrops Volume 5 paper pack.
I used the Artful Palette dies to cut 6 pieces of red patterned paper from the Backdrops (this works perfectly with all of Tim’s new Palette Paper Collection too). I took the largest square and heat embossed it with the casual ‘Hey There’ sentiment using Ranger Ink’s Vintage Pearl embossing powder (I’m a bit obsessed with this off-white, pearly powder right now). I did the same thing with the ‘what’s shakin’?’ stamp.

I took a couple of the die cut pieces and applied little bits of Tim Holtz Cello Tape on one edge to add to the vintage feel.
I splattered a 4 x 5.25” piece of Spellbinders Alabaster cardstock with Dr. Ph Martin’s Black Star India Ink using a tiny paintbrush. I matted it onto black cardstock. I used the layering templates to figure out the placement and then attached all the pieces with foam adhesive.
Finally, I used some of the same paper along with black glossy cardstock to cut 1 heart and 3 butterflies using the Artful Palette dies, and adhered those to the card.
Affiliate links are used in this post at no cost to you. This means I may receive a small commission when you click through and shop using the links I provide. This helps support me in creating and posting my crafts. Items marked with an asterisk * at first mention were provided by a store or manufacturer. Otherwise, all items were purchased by me. I do not get paid to promote any products.
One of the nicest things about the new Classic Friendship stamp set* by Cathy Zielske is how there are sentiments not only for any occasion, but for so many different size spaces. I decided to put together a card using both the Simon Says Stamp Artful Palette dies and templates, and the Tim Holtz idea-ology Backdrops Volume 5 paper pack.
I used the Artful Palette dies to cut 6 pieces of red patterned paper from the Backdrops (this works perfectly with all of Tim’s new Palette Paper Collection too). I took the largest square and heat embossed it with the casual ‘Hey There’ sentiment using Ranger Ink’s Vintage Pearl embossing powder (I’m a bit obsessed with this off-white, pearly powder right now). I did the same thing with the ‘what’s shakin’?’ stamp.
I took a couple of the die cut pieces and applied little bits of Tim Holtz Cello Tape on one edge to add to the vintage feel.
I splattered a 4 x 5.25” piece of Spellbinders Alabaster cardstock with Dr. Ph Martin’s Black Star India Ink using a tiny paintbrush. I matted it onto black cardstock. I used the layering templates to figure out the placement and then attached all the pieces with foam adhesive.
Finally, I used some of the same paper along with black glossy cardstock to cut 1 heart and 3 butterflies using the Artful Palette dies, and adhered those to the card.
Affiliate links are used in this post at no cost to you. This means I may receive a small commission when you click through and shop using the links I provide. This helps support me in creating and posting my crafts. Items marked with an asterisk * at first mention were provided by a store or manufacturer. Otherwise, all items were purchased by me. I do not get paid to promote any products.

For my final card to introduce the Classic Friendship stamp set* by Cathy Zielske and Simon Says Stamp in their Always There release, I pulled out my beloved Waffle Flower Postage Collage dies.
I first used the original A2 Waffle Flower Postage Collage die to cut one of the squares for behind the sentiment from Spellbinders Saffron cardstock. Next I used the Waffle Flower Envelope die to cut the diagonal lines that make the impression of envelopes on an A2 piece of Neenah cover stock. Then I used the Postage Collage Envelope stencils to ink blend on three Distress inks: Spiced Marmalade, Abandoned Coral, and Picked Raspberry. I did a very light pass for the bottom of the envelopes and a much heavier pass for the top part.
I stamped Miss You with Versa Clair black ink and cut it to perfectly fit the postage square.

I used the Postage Collage Blocks die to cut out all the envelopes. In all honesty, this ended up separating ALL the envelope tops from the bottoms, and I used washi tape on the back to join them up again to look like closed envelopes.
I splattered a piece of white cardstock with black India ink and matted it onto an A2 panel of black cardstock.
After arranging and adhering all the envelopes onto the splattered panel using foam adhesive, I added 3 butterflies cut from pearl paper from the Artful Palette die set by Simon Says Stamp.
Affiliate links are used in this post at no cost to you. This means I may receive a small commission when you click through and shop using the links I provide. This helps support me in creating and posting my crafts. Items marked with an asterisk * at first mention were provided by a store or manufacturer. Otherwise, all items were purchased by me. I do not get paid to promote any products.
For my final card to introduce the Classic Friendship stamp set* by Cathy Zielske and Simon Says Stamp in their Always There release, I pulled out my beloved Waffle Flower Postage Collage dies.
I first used the original A2 Waffle Flower Postage Collage die to cut one of the squares for behind the sentiment from Spellbinders Saffron cardstock. Next I used the Waffle Flower Envelope die to cut the diagonal lines that make the impression of envelopes on an A2 piece of Neenah cover stock. Then I used the Postage Collage Envelope stencils to ink blend on three Distress inks: Spiced Marmalade, Abandoned Coral, and Picked Raspberry. I did a very light pass for the bottom of the envelopes and a much heavier pass for the top part.
I stamped Miss You with Versa Clair black ink and cut it to perfectly fit the postage square.
I used the Postage Collage Blocks die to cut out all the envelopes. In all honesty, this ended up separating ALL the envelope tops from the bottoms, and I used washi tape on the back to join them up again to look like closed envelopes.
I splattered a piece of white cardstock with black India ink and matted it onto an A2 panel of black cardstock.
After arranging and adhering all the envelopes onto the splattered panel using foam adhesive, I added 3 butterflies cut from pearl paper from the Artful Palette die set by Simon Says Stamp.
Affiliate links are used in this post at no cost to you. This means I may receive a small commission when you click through and shop using the links I provide. This helps support me in creating and posting my crafts. Items marked with an asterisk * at first mention were provided by a store or manufacturer. Otherwise, all items were purchased by me. I do not get paid to promote any products.

Today's Always There release from Simon Says Stamp features a fantastic stamp set from Cathy Zielske of CZ Design called Classic Friendship*. It made a perfect pairing for the recently released Artsy Butterfly and Let’s Get Artsy stamp, stencil and die sets I paired 3 butterflies with the ‘let’s catch up’ stamp to make this card.
I started by taking an A2 piece of white Neenah Classic Crest and lightly ink blended a circular pink “glow” using Kitsch Flamingo Distress Ink with a Pinkfresh Studio 1” Blending Brush. I used Spellbinders Nested Postage and Label Die Set to first cut a stitched rectangle from the pink-inked panel, and then a white coordinating postage shape to fit perfectly behind it.

I first stamped the butterflies with Versafine black ink. Since it is a pigment ink, not even heating it will keep it from smearing (in my experience) when I do an ink blend on top of it. I put clear embossing powder over the ink and heat set it to get a crisp, smear-proof image. I ink blended through the coordinating stencils with Kitsch Flamingo, Picked Raspberry and Spiced Marmalade Distress inks. I die cut the butterflies with the coordinating dies and assembled the card with liquid glue. For a finishing touch I added clear sequins from This Calls For Confetti. It looks like these are no longer made, so I am putting a link to the closest match I found on Simon Says Stamp.
Affiliate links are used in this post at no cost to you. This means I may receive a small commission when you click through and shop using the links I provide. This helps support me in creating and posting my crafts. Items marked with an asterisk * at first mention were provided by a store or manufacturer. Otherwise, all items were purchased by me. I do not get paid to promote any products.
Today's Always There release from Simon Says Stamp features a fantastic stamp set from Cathy Zielske of CZ Design called Classic Friendship*. It made a perfect pairing for the recently released Artsy Butterfly and Let’s Get Artsy stamp, stencil and die sets I paired 3 butterflies with the ‘let’s catch up’ stamp to make this card.
I started by taking an A2 piece of white Neenah Classic Crest and lightly ink blended a circular pink “glow” using Kitsch Flamingo Distress Ink with a Pinkfresh Studio 1” Blending Brush. I used Spellbinders Nested Postage and Label Die Set to first cut a stitched rectangle from the pink-inked panel, and then a white coordinating postage shape to fit perfectly behind it.
I first stamped the butterflies with Versafine black ink. Since it is a pigment ink, not even heating it will keep it from smearing (in my experience) when I do an ink blend on top of it. I put clear embossing powder over the ink and heat set it to get a crisp, smear-proof image. I ink blended through the coordinating stencils with Kitsch Flamingo, Picked Raspberry and Spiced Marmalade Distress inks. I die cut the butterflies with the coordinating dies and assembled the card with liquid glue. For a finishing touch I added clear sequins from This Calls For Confetti. It looks like these are no longer made, so I am putting a link to the closest match I found on Simon Says Stamp.
Affiliate links are used in this post at no cost to you. This means I may receive a small commission when you click through and shop using the links I provide. This helps support me in creating and posting my crafts. Items marked with an asterisk * at first mention were provided by a store or manufacturer. Otherwise, all items were purchased by me. I do not get paid to promote any products.
Today I’m honored to be guest designer at the Try It On Tuesday Card Challenge Blog.
Since today’s challenge theme is Numbers, I considered making a birthday card, but then decided to go for an anniversary card. My daughter’s first wedding anniversary is in August. I knew from the get-go that I’d use the Tim Holtz Bulletin Alphanumeric set of dies. They’re my favorite set of alphas.


I chose the green Palette Paper Collection and hunted through the beautiful green patterns until I’d found my ideal cut outs. I had seen a card by Tina Smith for Simon Says Stamp where she used vellum layers over parts of the squares. I thought it was genius. I took some heavyweight vellum paper and stamped on it with two different stamps from the Honey Bee Stamps Mini Messages Everyday set in order to get the Happy Anniversary and the word Years. I heat embossed these onto the vellum using Ink On 3 Gold Rush embossing powder and then die cut them with the Artful Palette dies. I carefully ripped them and then adhered them to the other elements like this: The piece with Year on it allowed me to easily hide liquid adhesive under the planned placement of the giant 1. The Happy Anniversary piece needed an adhesive hiding spot so I added 2 tiny little hearts from another die I had (can’t remember which one) and hid the adhesive here. I also took a toothpick and hid a little glue under the letters (that was hard and took my strongest eye glasses).
I used Tim Holtz’s Bulletin Alphabet to cut out the 1 from thick black cardstock. I also cut the number one from matte gold cardstock and used just the inner portion to adhere to the center of the black one.
I also cut a heart and a butterfly from the gold, and a larger butterfly from the black and adhered all this as shown. I splattered a piece of 4 x 5.25” Basic Beige Stampin’ Up! cardstock with Tim Holtz Black Distress Paint using a tiny paint brush and his Splat Box. I mounted all this on an A2 piece of black cardstock.
What number will you choose for your Try It On Tuesday project? Look forward to seeing how you play along with us.
 |
| Try It On Tuesday Challenge Blog |
Affiliate links are used in this post at no cost to you. This means I may receive a small commission when you click through and shop using the links I provide. This helps support me in creating and posting my crafts. Items marked with an asterisk * at first mention were provided by a store or manufacturer. Otherwise, all items were purchased by me. I do not get paid to promote any products.
SUPPLIES USED
Today I’m honored to be guest designer at the Try It On Tuesday Card Challenge Blog.
Since today’s challenge theme is Numbers, I considered making a birthday card, but then decided to go for an anniversary card. My daughter’s first wedding anniversary is in August. I knew from the get-go that I’d use the Tim Holtz Bulletin Alphanumeric set of dies. They’re my favorite set of alphas.
I chose the green Palette Paper Collection and hunted through the beautiful green patterns until I’d found my ideal cut outs. I had seen a card by Tina Smith for Simon Says Stamp where she used vellum layers over parts of the squares. I thought it was genius. I took some heavyweight vellum paper and stamped on it with two different stamps from the Honey Bee Stamps Mini Messages Everyday set in order to get the Happy Anniversary and the word Years. I heat embossed these onto the vellum using Ink On 3 Gold Rush embossing powder and then die cut them with the Artful Palette dies. I carefully ripped them and then adhered them to the other elements like this: The piece with Year on it allowed me to easily hide liquid adhesive under the planned placement of the giant 1. The Happy Anniversary piece needed an adhesive hiding spot so I added 2 tiny little hearts from another die I had (can’t remember which one) and hid the adhesive here. I also took a toothpick and hid a little glue under the letters (that was hard and took my strongest eye glasses).
I used Tim Holtz’s Bulletin Alphabet to cut out the 1 from thick black cardstock. I also cut the number one from matte gold cardstock and used just the inner portion to adhere to the center of the black one.
I also cut a heart and a butterfly from the gold, and a larger butterfly from the black and adhered all this as shown. I splattered a piece of 4 x 5.25” Basic Beige Stampin’ Up! cardstock with Tim Holtz Black Distress Paint using a tiny paint brush and his Splat Box. I mounted all this on an A2 piece of black cardstock.
What number will you choose for your Try It On Tuesday project? Look forward to seeing how you play along with us.
|
| Try It On Tuesday Challenge Blog |
Affiliate links are used in this post at no cost to you. This means I may receive a small commission when you click through and shop using the links I provide. This helps support me in creating and posting my crafts. Items marked with an asterisk * at first mention were provided by a store or manufacturer. Otherwise, all items were purchased by me. I do not get paid to promote any products.
SUPPLIES USED
Spring and the color lavendar go together like the finest pairing of cheese and wine. They simply belong together. I made this card for my youngest daughter on the completion of her medical assistant certification. She loves lavendar. I used the Spellbinders Colorwheel Lavender cardstock along with Neenah Classic Crest 110lb cardstock. I dry embossed a 4” x 5.25” piece of lavender with the Simon Says Stamp Boho Flowers Embossing Folder. It’s an ideal floral pattern for almost any time of year.

Next, I matted that to a cardbase 4.25" x 5.5". I used the middle-size circle from the Pink Fresh Studios Elegant Circles die set and cut it (and kept the center) from the white cardstock. I used the Spellbinders Betterpress You Are Everything Letterpress inking plate and matching die along with their gold foil to create the sentiment on my Spellbinders Glimmer machine. The flowers are from Pinkfresh Studios Breezy Blossoms where I used their matching stamps, stencils and dies. The ink is Lavender Glaze from Taylored Expressions.
I assembled everything as shown and added Clear Iridescent sequins from This Calls for Confetti (such a cool business name.)

Affiliate links are used in this post at no cost to you. This means I may receive a small commission when you click through and shop using the links I provide. This helps support me in creating and posting my crafts. Items marked with an asterisk * at first mention were provided by a store or manufacturer. Otherwise, all items were purchased by me. I do not get paid to promote any products.
Spring and the color lavendar go together like the finest pairing of cheese and wine. They simply belong together. I made this card for my youngest daughter on the completion of her medical assistant certification. She loves lavendar. I used the Spellbinders Colorwheel Lavender cardstock along with Neenah Classic Crest 110lb cardstock. I dry embossed a 4” x 5.25” piece of lavender with the Simon Says Stamp Boho Flowers Embossing Folder. It’s an ideal floral pattern for almost any time of year.
Next, I matted that to a cardbase 4.25" x 5.5". I used the middle-size circle from the Pink Fresh Studios Elegant Circles die set and cut it (and kept the center) from the white cardstock. I used the Spellbinders Betterpress You Are Everything Letterpress inking plate and matching die along with their gold foil to create the sentiment on my Spellbinders Glimmer machine. The flowers are from Pinkfresh Studios Breezy Blossoms where I used their matching stamps, stencils and dies. The ink is Lavender Glaze from Taylored Expressions.
I assembled everything as shown and added Clear Iridescent sequins from This Calls for Confetti (such a cool business name.)
Affiliate links are used in this post at no cost to you. This means I may receive a small commission when you click through and shop using the links I provide. This helps support me in creating and posting my crafts. Items marked with an asterisk * at first mention were provided by a store or manufacturer. Otherwise, all items were purchased by me. I do not get paid to promote any products.
When I started this card I knew I wanted to combine this adorable Flourish Rabbit die from Simon Says Stamp with the Elegant Circles Die Set from Pinkfresh Studio. What I didn’t know is that I’d use one of the oldest embellishments I own and had never opened before (we’re talking 19 years, people).

I cut the bunny from Neenah Classic Crest 110lb coverstock. For the piece that makes the background of the ear, I gently ink blended a little Dried Marigold Distress Ink to give a hint of color. On that same piece, I colored the eye black so it would show through the top piece of the die. I used 2 alcohol ink markers to color the flower and leaves on the rabbit. I also used one of my lightest Copic markers (E40) to add in a hint of shading on a few edges of the rabbit.

I used the largest die in the Pinkfresh Studios Elegant Circles die set and cut it from a pale green cardstock, Soft Seafoam from Stampin’ Up!. I stacked this die cut with 3 more behind it to give it a lot of lift and sandwiched a circle of Heavyweight Vellum from Amazon amongst the stack. After I had glued the rabbit on this portion, I wanted to add tiny flowers and leaves on the bottom edge to give the rabbit something to sit on. I pulled out my basket of “paper flowers.” In this basket is both the kind of paper flowers I would buy from Prima decades ago and tiny little paper flowers from left over die cutting I had done recently. I unearthed an unopened package of tiny white paper flowers and silver brads from a long-ago company called Making Memories. I bought these in about 2007 when I was working for Archiver’s. I paired these cute little flowers with greenery from some large Poppystamps Pop Up Easel card die sets. I put tiny orange Poppystamps Fairy Jewels in the center of all the flowers and glued everything onto my circle frame.
I discovered an already paint splattered piece of Stampin’ Up! Crumb Cake in my stash, cut it into a 5 x 5” square and dry embossed it with the Tufted 3D Embossing Folder from Spellbinders. I backed this with a piece of pale orange cardstock 5.25 x 5.25” and another piece of Crumb Cake, 5.5 x 5.5”. Finally, I stamped a sentiment in dark green ink from the Simon Says Stamp Easter Greetings stamp set and used the Honeybee Stamps Mini Messages Banner die set to cut out the greeting. As usual, I attached this to a white cardbase.
I am entering this card in 3 challenges. First is the Simon Says Stamp Monday Challenge with the theme of Emboss It. Next is the Double Trouble Challenge using the 3-2-1 element (3 Copic markers, 2 new dies, 1 cotton tail) plus Thing 3 theme of Easter. Finally, I am entering the CreaLadies challenge with the theme of animal.
NOTE: Square cards in square envelopes, of any size, cost more to mail than a rectangular envelope. Please check with the USPS to make sure you have enough postage.
A very happy Easter to you!
Affiliate links are used in this post at no cost to you. This means I may receive a small commission when you click through and shop using the links I provide. This helps support me in creating and posting my crafts. Items marked with an asterisk * at first mention were provided by a store or manufacturer. Otherwise, all items were purchased by me. I do not get paid to promote any products.
When I started this card I knew I wanted to combine this adorable Flourish Rabbit die from Simon Says Stamp with the Elegant Circles Die Set from Pinkfresh Studio. What I didn’t know is that I’d use one of the oldest embellishments I own and had never opened before (we’re talking 19 years, people).
I cut the bunny from Neenah Classic Crest 110lb coverstock. For the piece that makes the background of the ear, I gently ink blended a little Dried Marigold Distress Ink to give a hint of color. On that same piece, I colored the eye black so it would show through the top piece of the die. I used 2 alcohol ink markers to color the flower and leaves on the rabbit. I also used one of my lightest Copic markers (E40) to add in a hint of shading on a few edges of the rabbit.
I used the largest die in the Pinkfresh Studios Elegant Circles die set and cut it from a pale green cardstock, Soft Seafoam from Stampin’ Up!. I stacked this die cut with 3 more behind it to give it a lot of lift and sandwiched a circle of Heavyweight Vellum from Amazon amongst the stack. After I had glued the rabbit on this portion, I wanted to add tiny flowers and leaves on the bottom edge to give the rabbit something to sit on. I pulled out my basket of “paper flowers.” In this basket is both the kind of paper flowers I would buy from Prima decades ago and tiny little paper flowers from left over die cutting I had done recently. I unearthed an unopened package of tiny white paper flowers and silver brads from a long-ago company called Making Memories. I bought these in about 2007 when I was working for Archiver’s. I paired these cute little flowers with greenery from some large Poppystamps Pop Up Easel card die sets. I put tiny orange Poppystamps Fairy Jewels in the center of all the flowers and glued everything onto my circle frame.
I discovered an already paint splattered piece of Stampin’ Up! Crumb Cake in my stash, cut it into a 5 x 5” square and dry embossed it with the Tufted 3D Embossing Folder from Spellbinders. I backed this with a piece of pale orange cardstock 5.25 x 5.25” and another piece of Crumb Cake, 5.5 x 5.5”. Finally, I stamped a sentiment in dark green ink from the Simon Says Stamp Easter Greetings stamp set and used the Honeybee Stamps Mini Messages Banner die set to cut out the greeting. As usual, I attached this to a white cardbase.
I am entering this card in 3 challenges. First is the Simon Says Stamp Monday Challenge with the theme of Emboss It. Next is the Double Trouble Challenge using the 3-2-1 element (3 Copic markers, 2 new dies, 1 cotton tail) plus Thing 3 theme of Easter. Finally, I am entering the CreaLadies challenge with the theme of animal.
NOTE: Square cards in square envelopes, of any size, cost more to mail than a rectangular envelope. Please check with the USPS to make sure you have enough postage.
A very happy Easter to you!
Affiliate links are used in this post at no cost to you. This means I may receive a small commission when you click through and shop using the links I provide. This helps support me in creating and posting my crafts. Items marked with an asterisk * at first mention were provided by a store or manufacturer. Otherwise, all items were purchased by me. I do not get paid to promote any products.

I made this graduation card for a dear family friend upon receiving her master's degree. The Yay You die and shadow die were designed by Cathy Zielske for Simon Says Stamp. The brick embossing folder is a retired Stampin' Up! product, but there are very similar, fantastic ones from Honey Bee Stamps here, and Altenew here.

I cut the graduation hat from my Silhouette as I did not have a die. The rainbow was hand drawn using a straight edge and a variety of Copic and other alcohol markers seen here, such as RV55 Hollyhock, RV17 Deep Magenta, R29 Lipstick Red, YR68 Orange, and V06 Lavender.

The sentiment strip was from my stash, along with the flat iridescent sequins. I am entering this at Addicted to CAS #304 and Simply Clean and Simple CAS Card Designs.
I made this graduation card for a dear family friend upon receiving her master's degree. The Yay You die and shadow die were designed by Cathy Zielske for Simon Says Stamp. The brick embossing folder is a retired Stampin' Up! product, but there are very similar, fantastic ones from Honey Bee Stamps here, and Altenew here.
I cut the graduation hat from my Silhouette as I did not have a die. The rainbow was hand drawn using a straight edge and a variety of Copic and other alcohol markers seen here, such as RV55 Hollyhock, RV17 Deep Magenta, R29 Lipstick Red, YR68 Orange, and V06 Lavender.
The sentiment strip was from my stash, along with the flat iridescent sequins. I am entering this at Addicted to CAS #304 and Simply Clean and Simple CAS Card Designs.
Hi everyone! I am very excited to announce I was invited to join the Simon Says Stamp Designer Family last month. So, today I am helping to introduce the In My Heart release from Simon Says Stamp. I have 3 cards to share today featuring the Bereavement Thank Yous* sentiment stamp set designed by Cathy Zielske for this release. Now, I think we’d all admit that this isn’t exactly a stamp set you’d be “excited” to use. However, when you’ve been through a significant loss of any kind, and people love and support you through it, you want to say thank you. This is that stamp set. It’s also an ideal set to have on hand to make thank you cards for someone else to give in their time of need. Those kinds of cards are a gift all unto themselves.


My first card was inspired by the gorgeous new Spellbinders Color Wheel cardstock. I chose their Oceanside cardstock (the color reminds me of Tim Holtz Uncharted Mariner Distress Ink) and cut 2 pieces to 4.25” x 5.5”. Next, I die cut a circle out of the right lower portion of 1 piece, leaving the perfect amount of room for my Bereavement Thank Yous sentiment to fit inside. Finally, I embossed it with the Tufted 3D Embossing folder from Spellbinders. That folder really has a Wow factor. With the flat piece, I heat embossed my sentiment onto the lower right portion to line up with the cut circle. I used Ink on 3 Gold Rush again.
Next, I die cut a variety of pieces of leaves and flowers from Poppystamps Floral Vase Pop Up Easel Set and Floral Cake Pop Up Easel Set. I glued those down on the embossed top piece and attached that with a lot of foam tape to the sentiment piece. Finally, I stamped the slender one-line sentiment from the same stamp set in a dark teal ink onto white cardstock. I used a Honey Bee Stamps sentiment strip die to cut it out. I attached it with glue on the left and 2 skinny strips of foam tape on the right to hover just below the gold sentiment. Finally, I attached all this to a white card base.


My second card features not only the Bereavement Thank Yous but also the Heart Flowers Background from Simon Says Stamp. I used a few of Tim Holtz’s Distress Watercolor Pencils from Set #4 and scribbled all over the stamp. I spritzed the stamp with water and then stamped it onto a light kraft cardstock. I did this 2-3 times to get one good impression. I absolutely love how those pencils (pigment-based) look on colored cardstock. I cut it to the size I wanted. Next, I took a copper colored cardstock and dry embossed it with a folder featuring an all-over-pattern. I cut that to a size just a fraction larger. Next, I took my Tim Holtz Tonic Paper Distresser (a favorite tool) and roughed up all the edges on both these pieces.
I heat embossed the “I appreciate you” (a great stamp for any kind of thank you) with Ink on 3 Gold Rush embossing powder on a strip of dark brown cardstock. I also die cut a circle from this same cardstock. Between these two, I sandwiched lots of leaves cut using Simon Says Stamp’s Eucalyptus Leaves die set and Trinity Stamps Wildflower Clippings. I used a darker kraft cardstock, the copper colored cardstock, and also a gold pearly cardstock from the Crafter’s Companion (Violet Studio) 6x6 Pearlescent Colours paper pack.
Finally, I added two pieces of rough twine (they came with a pack of tags I bought on Amazon) to the cluster and attached everything with glue and foam tape.


My third card is simpler and larger. I wanted a 5x7” card so I could allow a decent amount of white space around the sentiment. First, I used Pinkfresh Studio’s Breezy Blossoms set of dies, stamps, and stencils to make a few floral accents. I used Taylored Expressions Lavender Glaze ink and Dusty Concord Distress Ink to color the flowers. Next, I used a piece of Neenah Classic Crest 110lb Cover stock and stamped it with the Bereavement Thank Yous sentiment using black Versa Clair ink.
Leaving space above and below the sentiment, I die cut it using the Spellbinders Essential Arches dies. I cut a larger arch from black cardstock to mat it onto. I used a piece of Neenah cover stock about 3.5” x 5.5” and embossed it with Honey Bee Stamps Spring Medley 3D embossing folder. I mat that onto a piece of Taylored Expressions Lavender Glaze cardstock, and then onto my 5x7 piece of black cardstock. I assembled everything as shown and added tiny black gems around the floral accents. Of course, all this was glued to the top of a cardbase made out of Neenah 110lb cardstock.
Affiliate links are used in this post at no cost to you. This means I may receive a small commission when you click through and shop using the links I provide. This helps support me in creating and posting my crafts. Items marked with an asterisk (*) at first mention were provided by a store or manufacturer. Otherwise, all items were purchased by me. I do not get paid to promote any products.
Hi everyone! I am very excited to announce I was invited to join the Simon Says Stamp Designer Family last month. So, today I am helping to introduce the In My Heart release from Simon Says Stamp. I have 3 cards to share today featuring the Bereavement Thank Yous* sentiment stamp set designed by Cathy Zielske for this release. Now, I think we’d all admit that this isn’t exactly a stamp set you’d be “excited” to use. However, when you’ve been through a significant loss of any kind, and people love and support you through it, you want to say thank you. This is that stamp set. It’s also an ideal set to have on hand to make thank you cards for someone else to give in their time of need. Those kinds of cards are a gift all unto themselves.
My first card was inspired by the gorgeous new Spellbinders Color Wheel cardstock. I chose their Oceanside cardstock (the color reminds me of Tim Holtz Uncharted Mariner Distress Ink) and cut 2 pieces to 4.25” x 5.5”. Next, I die cut a circle out of the right lower portion of 1 piece, leaving the perfect amount of room for my Bereavement Thank Yous sentiment to fit inside. Finally, I embossed it with the Tufted 3D Embossing folder from Spellbinders. That folder really has a Wow factor. With the flat piece, I heat embossed my sentiment onto the lower right portion to line up with the cut circle. I used Ink on 3 Gold Rush again.
Next, I die cut a variety of pieces of leaves and flowers from Poppystamps Floral Vase Pop Up Easel Set and Floral Cake Pop Up Easel Set. I glued those down on the embossed top piece and attached that with a lot of foam tape to the sentiment piece. Finally, I stamped the slender one-line sentiment from the same stamp set in a dark teal ink onto white cardstock. I used a Honey Bee Stamps sentiment strip die to cut it out. I attached it with glue on the left and 2 skinny strips of foam tape on the right to hover just below the gold sentiment. Finally, I attached all this to a white card base.
My second card features not only the Bereavement Thank Yous but also the Heart Flowers Background from Simon Says Stamp. I used a few of Tim Holtz’s Distress Watercolor Pencils from Set #4 and scribbled all over the stamp. I spritzed the stamp with water and then stamped it onto a light kraft cardstock. I did this 2-3 times to get one good impression. I absolutely love how those pencils (pigment-based) look on colored cardstock. I cut it to the size I wanted. Next, I took a copper colored cardstock and dry embossed it with a folder featuring an all-over-pattern. I cut that to a size just a fraction larger. Next, I took my Tim Holtz Tonic Paper Distresser (a favorite tool) and roughed up all the edges on both these pieces.
I heat embossed the “I appreciate you” (a great stamp for any kind of thank you) with Ink on 3 Gold Rush embossing powder on a strip of dark brown cardstock. I also die cut a circle from this same cardstock. Between these two, I sandwiched lots of leaves cut using Simon Says Stamp’s Eucalyptus Leaves die set and Trinity Stamps Wildflower Clippings. I used a darker kraft cardstock, the copper colored cardstock, and also a gold pearly cardstock from the Crafter’s Companion (Violet Studio) 6x6 Pearlescent Colours paper pack.
Finally, I added two pieces of rough twine (they came with a pack of tags I bought on Amazon) to the cluster and attached everything with glue and foam tape.
My third card is simpler and larger. I wanted a 5x7” card so I could allow a decent amount of white space around the sentiment. First, I used Pinkfresh Studio’s Breezy Blossoms set of dies, stamps, and stencils to make a few floral accents. I used Taylored Expressions Lavender Glaze ink and Dusty Concord Distress Ink to color the flowers. Next, I used a piece of Neenah Classic Crest 110lb Cover stock and stamped it with the Bereavement Thank Yous sentiment using black Versa Clair ink.
Leaving space above and below the sentiment, I die cut it using the Spellbinders Essential Arches dies. I cut a larger arch from black cardstock to mat it onto. I used a piece of Neenah cover stock about 3.5” x 5.5” and embossed it with Honey Bee Stamps Spring Medley 3D embossing folder. I mat that onto a piece of Taylored Expressions Lavender Glaze cardstock, and then onto my 5x7 piece of black cardstock. I assembled everything as shown and added tiny black gems around the floral accents. Of course, all this was glued to the top of a cardbase made out of Neenah 110lb cardstock.
Affiliate links are used in this post at no cost to you. This means I may receive a small commission when you click through and shop using the links I provide. This helps support me in creating and posting my crafts. Items marked with an asterisk (*) at first mention were provided by a store or manufacturer. Otherwise, all items were purchased by me. I do not get paid to promote any products.
It won’t be long before the Cherry Blossoms begin to bloom in the eastern US. I love seeing pictures of these gorgeous trees, but I have not yet seen them in person.

Today’s card features the Papertrey Ink Into the Blooms: Cherry Blossoms die set. I cut the flowers from white and several shades of coral and peach cardstock. I also inked the edges of the white pieces with a delicate colored ink from Concord & 9th called Nectar.
I created the cloud background using a homemade stencil I created many years ago plus Tumbled Glass Distress Ink.

The Simon Says Stamp Celebrate sentiment is fantastic for so many different occasions.
It won’t be long before the Cherry Blossoms begin to bloom in the eastern US. I love seeing pictures of these gorgeous trees, but I have not yet seen them in person.
Today’s card features the Papertrey Ink Into the Blooms: Cherry Blossoms die set. I cut the flowers from white and several shades of coral and peach cardstock. I also inked the edges of the white pieces with a delicate colored ink from Concord & 9th called Nectar.
I created the cloud background using a homemade stencil I created many years ago plus Tumbled Glass Distress Ink.
The Simon Says Stamp Celebrate sentiment is fantastic for so many different occasions.
Well, here we are after all this time. 2026 is starting off with a bang and bucket list items. I attended the 2026 Rose Parade in Pasadena, CA (lots of rain and lots of fun). And on January 19, I became a grandmother for the first time to a little baby boy. I feel like I've already had a full year!
I had fun over the past 6 weeks working on 3 different Valentine designs.
The first is a CASE of a Tammy C. Wilson card. It features a retired stamp and die set by Stampin' Up called Sweet Conversations and Sweet Hearts, respectively. I used an old woodgrain 2D Sizzix embossing folder. Ink is Wisteria Wonder, Sweet Sugarplum, and Versamark. Embossing Powder is the wonderful Brutus Monroe Alabaster. Patterned paper was also retired from Stampin' Up! The splatter pattern was made with a spatter stamp from MFT. Cardstock is SU's Wisteria Wonder, Sweet Sugarplum (both retired) and Rich Razzleberry. Embellishments are from my stash.


The next card features a Honey Bee Stamps 3D embossing folder called Spring Medley. I used Pinkfresh Studio's Shaker Hearts dies, their Breezy Blossoms stamp, die and stencil sets, and their All Kinds of Wonderful stamp and die set for the sentiment. Inks I wasn't so good about keeping up with. I know I used Concord & 9th's Nectar and Grapefruit and then I used an orangish-red ink for the darkest color. The greens are very blue-green inks such as Distress Evergreen Bough. I used my handy color wheel to pick the greens and I was not disappointed.


The last card features the super cute Simon Says Stamp die set called Mail Call along with Taylored Expression's Papaya cardstock and Stampin' Up's Pretty Peacock. The sentiment is computer generated. The background uses Waffle Flower Love Postage Collage stamps along with the original WF Postage Collage stamps, all stamped with Concord & 9th's Powder dye ink. The arch dies are Spellbinder's Essential Arches. (Can you tell how much I like the coral-teal color combos?)


I am entering the Just Add Ink Challenge, the Cut It Up challenge, and the Alphabet Challenge.
Well, here we are after all this time. 2026 is starting off with a bang and bucket list items. I attended the 2026 Rose Parade in Pasadena, CA (lots of rain and lots of fun). And on January 19, I became a grandmother for the first time to a little baby boy. I feel like I've already had a full year!
I had fun over the past 6 weeks working on 3 different Valentine designs.
The first is a CASE of a Tammy C. Wilson card. It features a retired stamp and die set by Stampin' Up called Sweet Conversations and Sweet Hearts, respectively. I used an old woodgrain 2D Sizzix embossing folder. Ink is Wisteria Wonder, Sweet Sugarplum, and Versamark. Embossing Powder is the wonderful Brutus Monroe Alabaster. Patterned paper was also retired from Stampin' Up! The splatter pattern was made with a spatter stamp from MFT. Cardstock is SU's Wisteria Wonder, Sweet Sugarplum (both retired) and Rich Razzleberry. Embellishments are from my stash.
The next card features a Honey Bee Stamps 3D embossing folder called Spring Medley. I used Pinkfresh Studio's Shaker Hearts dies, their Breezy Blossoms stamp, die and stencil sets, and their All Kinds of Wonderful stamp and die set for the sentiment. Inks I wasn't so good about keeping up with. I know I used Concord & 9th's Nectar and Grapefruit and then I used an orangish-red ink for the darkest color. The greens are very blue-green inks such as Distress Evergreen Bough. I used my handy color wheel to pick the greens and I was not disappointed.
The last card features the super cute Simon Says Stamp die set called Mail Call along with Taylored Expression's Papaya cardstock and Stampin' Up's Pretty Peacock. The sentiment is computer generated. The background uses Waffle Flower Love Postage Collage stamps along with the original WF Postage Collage stamps, all stamped with Concord & 9th's Powder dye ink. The arch dies are Spellbinder's Essential Arches. (Can you tell how much I like the coral-teal color combos?)
I am entering the Just Add Ink Challenge, the Cut It Up challenge, and the Alphabet Challenge.

Yes, I'm still here. Like much of the blogosphere, I got busy with life. Since I am not trying to monetize this blog nor any of my social media, there is always other things pulling my attention. However, rest assured, I am creating almost everyday. Somedays it is an ink swatch book, other days a card, other days I am working on my daughter's wedding album.
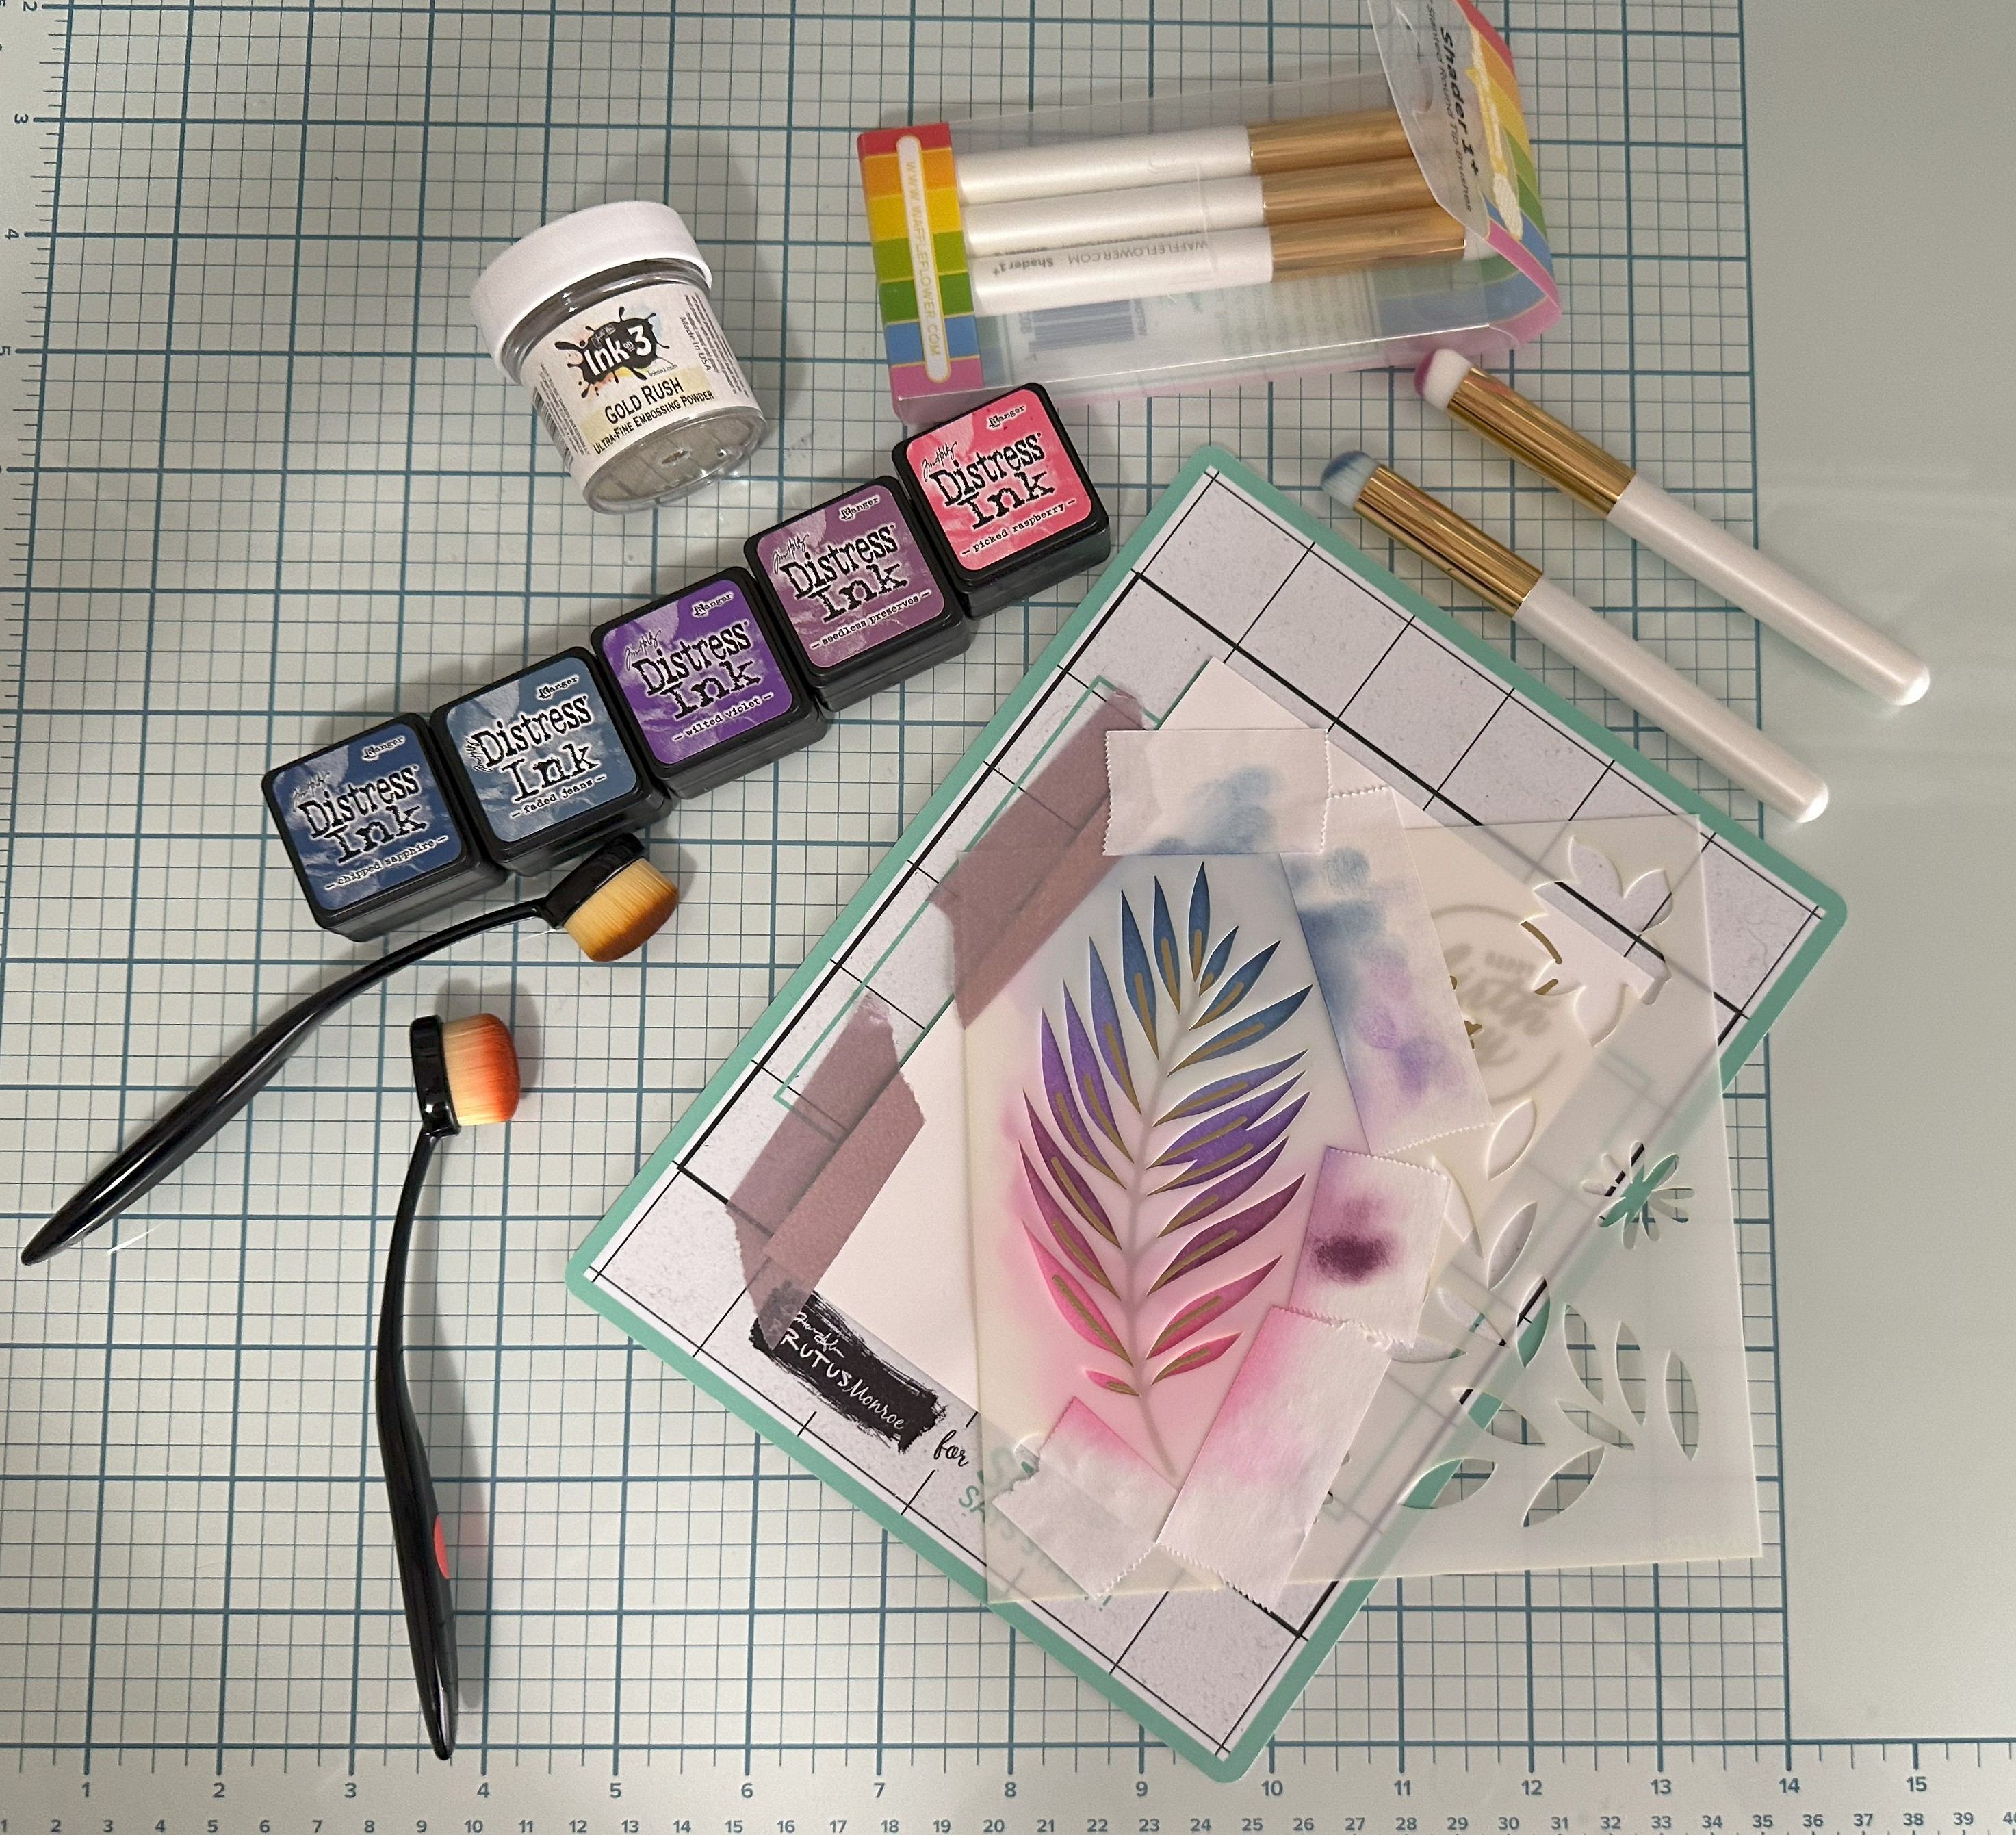
Today's card uses a fantastic set I stumbled upon at Simon Says Stamp. It is called Fantastic Flowers and when I purchased it (on sale!) it came with stamps, dies AND a stencil set. Now, that's winning. Currently only the stencils and dies are available. I've been watching oodles of Jennifer McGuire videos and she's done so much ink blending through stencils that the technique called my name.
I first stamped the palm frond stem in Versamark on Hammermill 80lb white cardstock (later I glued this to a 110lb Neenah Solar White Classic Crest piece after they were both die cut - gave it some real heft). I also stamped the Happy Birthday from Simon Says Stamp's Circle Sayings Stamp set in Versamark. I used my Ink on Three Gold Rush gold embossing powder (five stars, highly recommend) to heat emboss both images. Next, I put down the stencil and blended Tim Holtz Distress Ink in Picked Raspberry, Seedless Preserves, Wilted Violet, Faded Jeans and Chipped Sapphire together. I was thrilled with the results and I know I will make more because it was so fun. (A thanks to Cathy Zielske or I would never have thought to do the stem before the stenciling but it worked perfectly).


I used the matching die to cut the stenciled image and a "shadow" from Stampin' Up's Berry Burst cardstock. I glued both these down onto 110lb Neenah cardstock. I die cut the circle saying with a circle die from Trinity Stamps and popped it up with some foam tape. The wonderful hole-free sequins are in a brushed gold and from Spellbinders. Pretty simple card that was really fun to make.
I'm going to enter this at Paper Players Tic-Tac-Toe Challenge PP731. I think it meets the criteria of sentiment, lavender, and glitter.
I hope to get back here with more cards but I know I will post more on my Instagram too. Thanks for reading this and happy crafting.
Yes, I'm still here. Like much of the blogosphere, I got busy with life. Since I am not trying to monetize this blog nor any of my social media, there is always other things pulling my attention. However, rest assured, I am creating almost everyday. Somedays it is an ink swatch book, other days a card, other days I am working on my daughter's wedding album.
Today's card uses a fantastic set I stumbled upon at Simon Says Stamp. It is called Fantastic Flowers and when I purchased it (on sale!) it came with stamps, dies AND a stencil set. Now, that's winning. Currently only the stencils and dies are available. I've been watching oodles of Jennifer McGuire videos and she's done so much ink blending through stencils that the technique called my name.
I first stamped the palm frond stem in Versamark on Hammermill 80lb white cardstock (later I glued this to a 110lb Neenah Solar White Classic Crest piece after they were both die cut - gave it some real heft). I also stamped the Happy Birthday from Simon Says Stamp's Circle Sayings Stamp set in Versamark. I used my Ink on Three Gold Rush gold embossing powder (five stars, highly recommend) to heat emboss both images. Next, I put down the stencil and blended Tim Holtz Distress Ink in Picked Raspberry, Seedless Preserves, Wilted Violet, Faded Jeans and Chipped Sapphire together. I was thrilled with the results and I know I will make more because it was so fun. (A thanks to Cathy Zielske or I would never have thought to do the stem before the stenciling but it worked perfectly).
I used the matching die to cut the stenciled image and a "shadow" from Stampin' Up's Berry Burst cardstock. I glued both these down onto 110lb Neenah cardstock. I die cut the circle saying with a circle die from Trinity Stamps and popped it up with some foam tape. The wonderful hole-free sequins are in a brushed gold and from Spellbinders. Pretty simple card that was really fun to make.
I'm going to enter this at Paper Players Tic-Tac-Toe Challenge PP731. I think it meets the criteria of sentiment, lavender, and glitter.
I hope to get back here with more cards but I know I will post more on my Instagram too. Thanks for reading this and happy crafting.

And I am ever so grateful to one of the best cardmakers out there, Inge Groot, for telling me about the S-Lon Tex 210 Beading Cord. I bought some on Etsy and I love it!.
And I am ever so grateful to one of the best cardmakers out there, Inge Groot, for telling me about the S-Lon Tex 210 Beading Cord. I bought some on Etsy and I love it!.

Whew! January was a wild ride. Briefly, my daughter got married January 26 and I was the wedding planner. It wasn't an easy job, but everything went off without a hitch.
On to Valentine's Day! I love making Valentine cards because I love the color schemes that include plenty of pinks, reds and purples with lots of white thrown in.

I've made 15 different cards with Simon Says Stamp's Outline Love wafer die set and the Heart to Heart Background cling stamp. This combo is so much fun. I love all the different combinations of die cut inlay you can do with the die. I also put my Sizzix Sticky Grid paper to the test by cutting out the word LOVE and one of the dies from the Paper Rose Stitched Rectangles set all at the same time.


First I heat embossed the background stamp with Brutus Monroe's excellent Alabaster embossing powder. Then, I used the dip and dry technique with a combination of Tim Holtz's Spray Stains and his Mica Sprays for most of my backgrounds. I used SO many and had a blast. That Mica Spray really gives a pop of glimmer where you need it.

The You die is also from Simon Says Stamp. My embellishments are from my stash. And the cute Valentine cookie cutters are from my friend, Kristen.
Whew! January was a wild ride. Briefly, my daughter got married January 26 and I was the wedding planner. It wasn't an easy job, but everything went off without a hitch.
On to Valentine's Day! I love making Valentine cards because I love the color schemes that include plenty of pinks, reds and purples with lots of white thrown in.
I've made 15 different cards with Simon Says Stamp's Outline Love wafer die set and the Heart to Heart Background cling stamp. This combo is so much fun. I love all the different combinations of die cut inlay you can do with the die. I also put my Sizzix Sticky Grid paper to the test by cutting out the word LOVE and one of the dies from the Paper Rose Stitched Rectangles set all at the same time.
First I heat embossed the background stamp with Brutus Monroe's excellent Alabaster embossing powder. Then, I used the dip and dry technique with a combination of Tim Holtz's Spray Stains and his Mica Sprays for most of my backgrounds. I used SO many and had a blast. That Mica Spray really gives a pop of glimmer where you need it.
The You die is also from Simon Says Stamp. My embellishments are from my stash. And the cute Valentine cookie cutters are from my friend, Kristen.

