

Introducing the Whimsical Village* by Vicky Papaioannou for Spellbinders. This adorable collection includes so many fantastic pieces and add-ons, along with a fun swirly embossing folder, and a cute typewriter-style sentiment set.
Here I used heavy white cardstock to do three things. 1. I dry embossed a white A6 panel with the Whimsical Skies* 3D embossing folder. 2. I die cut some adorable little embossed clouds with the Village Companions* die set. 3. I cut 3 cute houses from the Whimsical Houses* die set.

Next, I used 3 colors of polka-dotted paper to die cut the same three houses and glued these onto the white cut outs for support, since my dotted paper was thin. I used gray, light blue, orange, red and pink Spellbinders cardstock to cut the house details.
I used Brutus Monroe’s Alabaster embossing powder to heat emboss my sentiment from the Whimsical Wishes* Stamp set onto a label using the Sentiment Labels die set. The “string” is part of the die set and is just white cardstock. Love that detail.
I adhered everything with foam adhesive tape and liquid glue.
Affiliate links are used in this post at no cost to you. This means I may receive a small commission when you click through and shop using the links I provide. This helps support me in creating and posting my crafts. Items marked with an asterisk * at first mention were provided by a store or manufacturer. Otherwise, all items were purchased by me.
Introducing the Whimsical Village* by Vicky Papaioannou for Spellbinders. This adorable collection includes so many fantastic pieces and add-ons, along with a fun swirly embossing folder, and a cute typewriter-style sentiment set.
Here I used heavy white cardstock to do three things. 1. I dry embossed a white A6 panel with the Whimsical Skies* 3D embossing folder. 2. I die cut some adorable little embossed clouds with the Village Companions* die set. 3. I cut 3 cute houses from the Whimsical Houses* die set.
Next, I used 3 colors of polka-dotted paper to die cut the same three houses and glued these onto the white cut outs for support, since my dotted paper was thin. I used gray, light blue, orange, red and pink Spellbinders cardstock to cut the house details.
I used Brutus Monroe’s Alabaster embossing powder to heat emboss my sentiment from the Whimsical Wishes* Stamp set onto a label using the Sentiment Labels die set. The “string” is part of the die set and is just white cardstock. Love that detail.
I adhered everything with foam adhesive tape and liquid glue.
Affiliate links are used in this post at no cost to you. This means I may receive a small commission when you click through and shop using the links I provide. This helps support me in creating and posting my crafts. Items marked with an asterisk * at first mention were provided by a store or manufacturer. Otherwise, all items were purchased by me.
I made this cute little tag set to introduce the Classic Friendship stamp set*, designed by Cathy Zielske for the Always There release by Simon Says Stamp. Talk about a real go-to stamp set, this set has everything you need for any occasion. From a simple ‘Hey There’ to a humorous ‘you get my kind of weird,’ to a sweet ‘hey, buddy’ (I’m thinking of my grandson with that last one), this set has a clean and simple look that fits any card style or size.

I would end up using the Simon Says Stamp Festive Tags die set for all 4 tags. I cut 1 from heat-resistant acetate. I think this tag set was recently retired from the store, but something like the two sets I've linked below (or any tag die) would work perfectly.
First, on all my heat embossing, I generously dust the surface with an anti-static powder. Mine is a no-name tool a friend gifted me years ago, but I can recommend the Simon Says Stamp Brush Powder Tool. On the heat resistant acetate I used Versamark to stamp ‘Hey Friend,’ and then closer to the bottom ‘I’m always here for you’ using Brutus Monroe’s Alabaster embossing powder. I added a little heart cut from Memory Box Rainbow Reflections 6x6 paper pad, and the Artful Palette die set and glued it onto the corner of the acetate tag.
I took Distress Watercolor Paper and used the smooth side to dip into Tim Holtz Distress Spray Stain in Salty Ocean, Salvaged Patina, Shabby Shutters, and Squeezed Lemonade with his Tonic Media Surface Mat (the mat makes the wet media bead up and create great little dots of color when you absorb it with paper). I dried between layers to get some depth. I went very heavy on the Salvaged Patina and Salty Ocean because I wanted a deeply colored background to make the white embossing stand out. I cut out my favorite part with the same tag die. I used embossed ‘you’re always there for me’ in white.

For the 3rd tag, I used a stamp set I have been itching to have for years and finally bought - Tiny Prints from Tim Holtz and Stampers Anonymous. I used my Distress Mini ink cubes in Salvaged Patina and Salty Ocean and inked the stamp multiple times to get a vivid impression onto Neenah Classic Crest 110 cover stock. I cut out my favorite bit with the tag die. I stamped the ‘always remember that’ with Lakefront ink from Concord & 9th onto a scrap piece of white, and cut it out with the Honey Bee Stamps Mini Messages Banners die set and attached it with foam adhesive.
For the last tag, I used Spellbinders Teal Topaz Colorwheel cardstock to cut out the fourth tag. Then I took the tag and dry embossed it with the Simon Says Stamp Embossing Folder Tiny Tufts. I then took my favorite white pigment ink, Sugar Cube by Taylored Expressions, and swiped it across the raised portions of the dry embossing. I love this effect.
I used one of the hole reinforcer dies that comes with the Festive Tags die set to cut the little piece from lime green polka-dotted paper and glued it over the watercolor tag. I tied the set together with a blue grosgrain ribbon and lime green twine and blue and white bakers twine.
Affiliate links are used in this post at no cost to you. This means I may receive a small commission when you click through and shop using the links I provide. This helps support me in creating and posting my crafts. Items marked with an asterisk * at first mention were provided by a store or manufacturer. Otherwise, all items were purchased by me. I do not get paid to promote any products.
I made this cute little tag set to introduce the Classic Friendship stamp set*, designed by Cathy Zielske for the Always There release by Simon Says Stamp. Talk about a real go-to stamp set, this set has everything you need for any occasion. From a simple ‘Hey There’ to a humorous ‘you get my kind of weird,’ to a sweet ‘hey, buddy’ (I’m thinking of my grandson with that last one), this set has a clean and simple look that fits any card style or size.
I would end up using the Simon Says Stamp Festive Tags die set for all 4 tags. I cut 1 from heat-resistant acetate. I think this tag set was recently retired from the store, but something like the two sets I've linked below (or any tag die) would work perfectly.
First, on all my heat embossing, I generously dust the surface with an anti-static powder. Mine is a no-name tool a friend gifted me years ago, but I can recommend the Simon Says Stamp Brush Powder Tool. On the heat resistant acetate I used Versamark to stamp ‘Hey Friend,’ and then closer to the bottom ‘I’m always here for you’ using Brutus Monroe’s Alabaster embossing powder. I added a little heart cut from Memory Box Rainbow Reflections 6x6 paper pad, and the Artful Palette die set and glued it onto the corner of the acetate tag.
I took Distress Watercolor Paper and used the smooth side to dip into Tim Holtz Distress Spray Stain in Salty Ocean, Salvaged Patina, Shabby Shutters, and Squeezed Lemonade with his Tonic Media Surface Mat (the mat makes the wet media bead up and create great little dots of color when you absorb it with paper). I dried between layers to get some depth. I went very heavy on the Salvaged Patina and Salty Ocean because I wanted a deeply colored background to make the white embossing stand out. I cut out my favorite part with the same tag die. I used embossed ‘you’re always there for me’ in white.
For the 3rd tag, I used a stamp set I have been itching to have for years and finally bought - Tiny Prints from Tim Holtz and Stampers Anonymous. I used my Distress Mini ink cubes in Salvaged Patina and Salty Ocean and inked the stamp multiple times to get a vivid impression onto Neenah Classic Crest 110 cover stock. I cut out my favorite bit with the tag die. I stamped the ‘always remember that’ with Lakefront ink from Concord & 9th onto a scrap piece of white, and cut it out with the Honey Bee Stamps Mini Messages Banners die set and attached it with foam adhesive.
For the last tag, I used Spellbinders Teal Topaz Colorwheel cardstock to cut out the fourth tag. Then I took the tag and dry embossed it with the Simon Says Stamp Embossing Folder Tiny Tufts. I then took my favorite white pigment ink, Sugar Cube by Taylored Expressions, and swiped it across the raised portions of the dry embossing. I love this effect.
I used one of the hole reinforcer dies that comes with the Festive Tags die set to cut the little piece from lime green polka-dotted paper and glued it over the watercolor tag. I tied the set together with a blue grosgrain ribbon and lime green twine and blue and white bakers twine.
Affiliate links are used in this post at no cost to you. This means I may receive a small commission when you click through and shop using the links I provide. This helps support me in creating and posting my crafts. Items marked with an asterisk * at first mention were provided by a store or manufacturer. Otherwise, all items were purchased by me. I do not get paid to promote any products.

One of the nicest things about the new Classic Friendship stamp set* by Cathy Zielske is how there are sentiments not only for any occasion, but for so many different size spaces. I decided to put together a card using both the Simon Says Stamp Artful Palette dies and templates, and the Tim Holtz idea-ology Backdrops Volume 5 paper pack.
I used the Artful Palette dies to cut 6 pieces of red patterned paper from the Backdrops (this works perfectly with all of Tim’s new Palette Paper Collection too). I took the largest square and heat embossed it with the casual ‘Hey There’ sentiment using Ranger Ink’s Vintage Pearl embossing powder (I’m a bit obsessed with this off-white, pearly powder right now). I did the same thing with the ‘what’s shakin’?’ stamp.

I took a couple of the die cut pieces and applied little bits of Tim Holtz Cello Tape on one edge to add to the vintage feel.
I splattered a 4 x 5.25” piece of Spellbinders Alabaster cardstock with Dr. Ph Martin’s Black Star India Ink using a tiny paintbrush. I matted it onto black cardstock. I used the layering templates to figure out the placement and then attached all the pieces with foam adhesive.
Finally, I used some of the same paper along with black glossy cardstock to cut 1 heart and 3 butterflies using the Artful Palette dies, and adhered those to the card.
Affiliate links are used in this post at no cost to you. This means I may receive a small commission when you click through and shop using the links I provide. This helps support me in creating and posting my crafts. Items marked with an asterisk * at first mention were provided by a store or manufacturer. Otherwise, all items were purchased by me. I do not get paid to promote any products.
One of the nicest things about the new Classic Friendship stamp set* by Cathy Zielske is how there are sentiments not only for any occasion, but for so many different size spaces. I decided to put together a card using both the Simon Says Stamp Artful Palette dies and templates, and the Tim Holtz idea-ology Backdrops Volume 5 paper pack.
I used the Artful Palette dies to cut 6 pieces of red patterned paper from the Backdrops (this works perfectly with all of Tim’s new Palette Paper Collection too). I took the largest square and heat embossed it with the casual ‘Hey There’ sentiment using Ranger Ink’s Vintage Pearl embossing powder (I’m a bit obsessed with this off-white, pearly powder right now). I did the same thing with the ‘what’s shakin’?’ stamp.
I took a couple of the die cut pieces and applied little bits of Tim Holtz Cello Tape on one edge to add to the vintage feel.
I splattered a 4 x 5.25” piece of Spellbinders Alabaster cardstock with Dr. Ph Martin’s Black Star India Ink using a tiny paintbrush. I matted it onto black cardstock. I used the layering templates to figure out the placement and then attached all the pieces with foam adhesive.
Finally, I used some of the same paper along with black glossy cardstock to cut 1 heart and 3 butterflies using the Artful Palette dies, and adhered those to the card.
Affiliate links are used in this post at no cost to you. This means I may receive a small commission when you click through and shop using the links I provide. This helps support me in creating and posting my crafts. Items marked with an asterisk * at first mention were provided by a store or manufacturer. Otherwise, all items were purchased by me. I do not get paid to promote any products.

Today's Always There release from Simon Says Stamp features a fantastic stamp set from Cathy Zielske of CZ Design called Classic Friendship*. It made a perfect pairing for the recently released Artsy Butterfly and Let’s Get Artsy stamp, stencil and die sets I paired 3 butterflies with the ‘let’s catch up’ stamp to make this card.
I started by taking an A2 piece of white Neenah Classic Crest and lightly ink blended a circular pink “glow” using Kitsch Flamingo Distress Ink with a Pinkfresh Studio 1” Blending Brush. I used Spellbinders Nested Postage and Label Die Set to first cut a stitched rectangle from the pink-inked panel, and then a white coordinating postage shape to fit perfectly behind it.

I first stamped the butterflies with Versafine black ink. Since it is a pigment ink, not even heating it will keep it from smearing (in my experience) when I do an ink blend on top of it. I put clear embossing powder over the ink and heat set it to get a crisp, smear-proof image. I ink blended through the coordinating stencils with Kitsch Flamingo, Picked Raspberry and Spiced Marmalade Distress inks. I die cut the butterflies with the coordinating dies and assembled the card with liquid glue. For a finishing touch I added clear sequins from This Calls For Confetti. It looks like these are no longer made, so I am putting a link to the closest match I found on Simon Says Stamp.
Affiliate links are used in this post at no cost to you. This means I may receive a small commission when you click through and shop using the links I provide. This helps support me in creating and posting my crafts. Items marked with an asterisk * at first mention were provided by a store or manufacturer. Otherwise, all items were purchased by me. I do not get paid to promote any products.
Today's Always There release from Simon Says Stamp features a fantastic stamp set from Cathy Zielske of CZ Design called Classic Friendship*. It made a perfect pairing for the recently released Artsy Butterfly and Let’s Get Artsy stamp, stencil and die sets I paired 3 butterflies with the ‘let’s catch up’ stamp to make this card.
I started by taking an A2 piece of white Neenah Classic Crest and lightly ink blended a circular pink “glow” using Kitsch Flamingo Distress Ink with a Pinkfresh Studio 1” Blending Brush. I used Spellbinders Nested Postage and Label Die Set to first cut a stitched rectangle from the pink-inked panel, and then a white coordinating postage shape to fit perfectly behind it.
I first stamped the butterflies with Versafine black ink. Since it is a pigment ink, not even heating it will keep it from smearing (in my experience) when I do an ink blend on top of it. I put clear embossing powder over the ink and heat set it to get a crisp, smear-proof image. I ink blended through the coordinating stencils with Kitsch Flamingo, Picked Raspberry and Spiced Marmalade Distress inks. I die cut the butterflies with the coordinating dies and assembled the card with liquid glue. For a finishing touch I added clear sequins from This Calls For Confetti. It looks like these are no longer made, so I am putting a link to the closest match I found on Simon Says Stamp.
Affiliate links are used in this post at no cost to you. This means I may receive a small commission when you click through and shop using the links I provide. This helps support me in creating and posting my crafts. Items marked with an asterisk * at first mention were provided by a store or manufacturer. Otherwise, all items were purchased by me. I do not get paid to promote any products.

Yes, I'm still here. Like much of the blogosphere, I got busy with life. Since I am not trying to monetize this blog nor any of my social media, there is always other things pulling my attention. However, rest assured, I am creating almost everyday. Somedays it is an ink swatch book, other days a card, other days I am working on my daughter's wedding album.
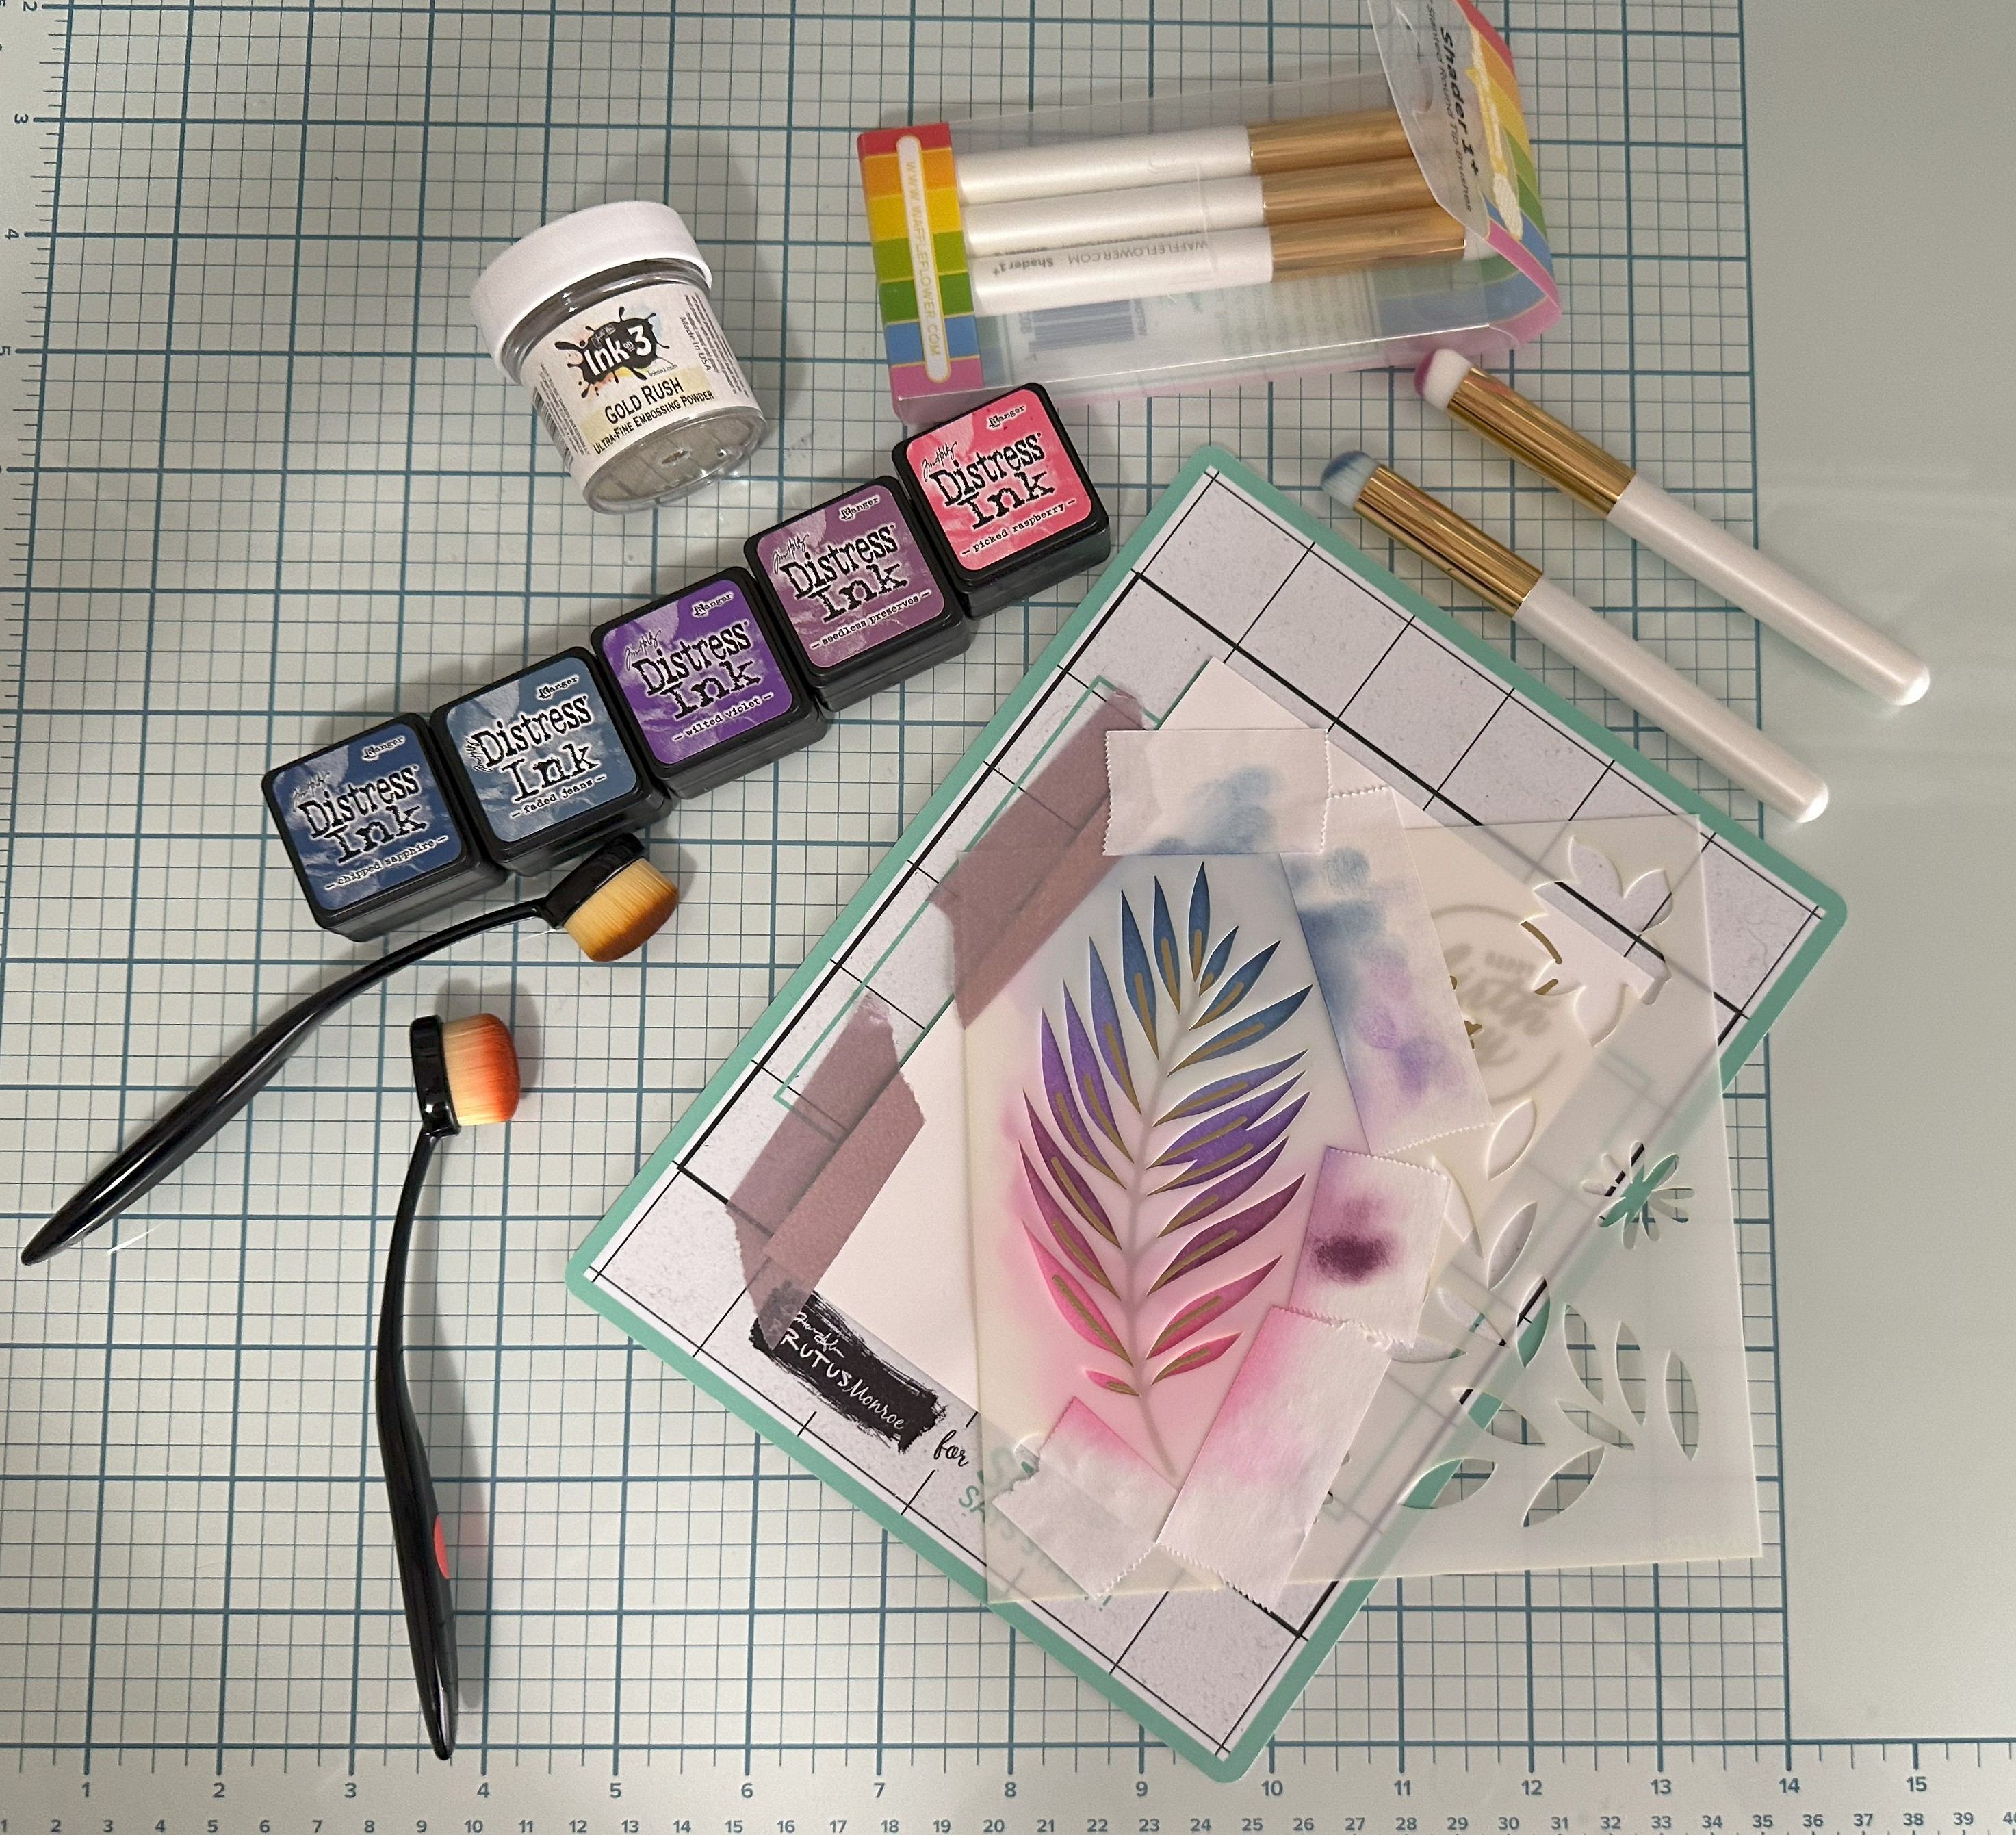
Today's card uses a fantastic set I stumbled upon at Simon Says Stamp. It is called Fantastic Flowers and when I purchased it (on sale!) it came with stamps, dies AND a stencil set. Now, that's winning. Currently only the stencils and dies are available. I've been watching oodles of Jennifer McGuire videos and she's done so much ink blending through stencils that the technique called my name.
I first stamped the palm frond stem in Versamark on Hammermill 80lb white cardstock (later I glued this to a 110lb Neenah Solar White Classic Crest piece after they were both die cut - gave it some real heft). I also stamped the Happy Birthday from Simon Says Stamp's Circle Sayings Stamp set in Versamark. I used my Ink on Three Gold Rush gold embossing powder (five stars, highly recommend) to heat emboss both images. Next, I put down the stencil and blended Tim Holtz Distress Ink in Picked Raspberry, Seedless Preserves, Wilted Violet, Faded Jeans and Chipped Sapphire together. I was thrilled with the results and I know I will make more because it was so fun. (A thanks to Cathy Zielske or I would never have thought to do the stem before the stenciling but it worked perfectly).


I used the matching die to cut the stenciled image and a "shadow" from Stampin' Up's Berry Burst cardstock. I glued both these down onto 110lb Neenah cardstock. I die cut the circle saying with a circle die from Trinity Stamps and popped it up with some foam tape. The wonderful hole-free sequins are in a brushed gold and from Spellbinders. Pretty simple card that was really fun to make.
I'm going to enter this at Paper Players Tic-Tac-Toe Challenge PP731. I think it meets the criteria of sentiment, lavender, and glitter.
I hope to get back here with more cards but I know I will post more on my Instagram too. Thanks for reading this and happy crafting.
Yes, I'm still here. Like much of the blogosphere, I got busy with life. Since I am not trying to monetize this blog nor any of my social media, there is always other things pulling my attention. However, rest assured, I am creating almost everyday. Somedays it is an ink swatch book, other days a card, other days I am working on my daughter's wedding album.
Today's card uses a fantastic set I stumbled upon at Simon Says Stamp. It is called Fantastic Flowers and when I purchased it (on sale!) it came with stamps, dies AND a stencil set. Now, that's winning. Currently only the stencils and dies are available. I've been watching oodles of Jennifer McGuire videos and she's done so much ink blending through stencils that the technique called my name.
I first stamped the palm frond stem in Versamark on Hammermill 80lb white cardstock (later I glued this to a 110lb Neenah Solar White Classic Crest piece after they were both die cut - gave it some real heft). I also stamped the Happy Birthday from Simon Says Stamp's Circle Sayings Stamp set in Versamark. I used my Ink on Three Gold Rush gold embossing powder (five stars, highly recommend) to heat emboss both images. Next, I put down the stencil and blended Tim Holtz Distress Ink in Picked Raspberry, Seedless Preserves, Wilted Violet, Faded Jeans and Chipped Sapphire together. I was thrilled with the results and I know I will make more because it was so fun. (A thanks to Cathy Zielske or I would never have thought to do the stem before the stenciling but it worked perfectly).
I used the matching die to cut the stenciled image and a "shadow" from Stampin' Up's Berry Burst cardstock. I glued both these down onto 110lb Neenah cardstock. I die cut the circle saying with a circle die from Trinity Stamps and popped it up with some foam tape. The wonderful hole-free sequins are in a brushed gold and from Spellbinders. Pretty simple card that was really fun to make.
I'm going to enter this at Paper Players Tic-Tac-Toe Challenge PP731. I think it meets the criteria of sentiment, lavender, and glitter.
I hope to get back here with more cards but I know I will post more on my Instagram too. Thanks for reading this and happy crafting.

I guess I am on a roll. I decided to make yet another slimline, mixed media card featuring a big butterfly. This time it is a stamp called Big Butterfly (really) by Impression Obsession. My other ingredients for this card were Distress Oxide Inks in Milled Lavender, Dusty Concord and Faded Jeans. I stamped on the oxides with Tim Holtz's Ledger Script stamps using his Archival ink in Black Soot. Then I applied a thin coat of gesso over what I had. I stamped with the Tim Holtz Field Notes stamp set in both Archival gray and black. I die cut the film strip from black cardstock. I stamped the butterfly stamp onto Bristol Smooth paper with black to get the sharpest image I could. Then I used Distress inks in Dusty Concord and Stormy Sky to get the purple I used to paint on the butterfly.

I made a giant mess splattering the filmstrip, cardbase and butterfly with Distress White Paint (I am splatter impaired). I stamped Tim Holtz's Floral Outlines stamp set onto heavy vellum paper with Versamark and embossed using Brutus Monroe Alabaster embossing powder. I tore a strip of that to go under the butterfly. I computer printed the saying which I found on Pinterest and cut it out in strips. I used foam tape to glue it over a white thread nest.
I matted the entire thing onto black cardstock. This is another card going out to a young female relative.
I am entering this card at the Simon Says Stamp Monday Challenge, the Simon Says Stamp Wednesday Challenge, the Stamping Sensations challenge, the Creative Artiste Challenge, and the We Love Stamping Challenge., and the We Love to Create Challenge and also the Triple B challenge
I guess I am on a roll. I decided to make yet another slimline, mixed media card featuring a big butterfly. This time it is a stamp called Big Butterfly (really) by Impression Obsession. My other ingredients for this card were Distress Oxide Inks in Milled Lavender, Dusty Concord and Faded Jeans. I stamped on the oxides with Tim Holtz's Ledger Script stamps using his Archival ink in Black Soot. Then I applied a thin coat of gesso over what I had. I stamped with the Tim Holtz Field Notes stamp set in both Archival gray and black. I die cut the film strip from black cardstock. I stamped the butterfly stamp onto Bristol Smooth paper with black to get the sharpest image I could. Then I used Distress inks in Dusty Concord and Stormy Sky to get the purple I used to paint on the butterfly.
I made a giant mess splattering the filmstrip, cardbase and butterfly with Distress White Paint (I am splatter impaired). I stamped Tim Holtz's Floral Outlines stamp set onto heavy vellum paper with Versamark and embossed using Brutus Monroe Alabaster embossing powder. I tore a strip of that to go under the butterfly. I computer printed the saying which I found on Pinterest and cut it out in strips. I used foam tape to glue it over a white thread nest.
I matted the entire thing onto black cardstock. This is another card going out to a young female relative.
I am entering this card at the Simon Says Stamp Monday Challenge, the Simon Says Stamp Wednesday Challenge, the Stamping Sensations challenge, the Creative Artiste Challenge, and the We Love Stamping Challenge., and the We Love to Create Challenge and also the Triple B challenge

Whew! January was a wild ride. Briefly, my daughter got married January 26 and I was the wedding planner. It wasn't an easy job, but everything went off without a hitch.
On to Valentine's Day! I love making Valentine cards because I love the color schemes that include plenty of pinks, reds and purples with lots of white thrown in.

I've made 15 different cards with Simon Says Stamp's Outline Love wafer die set and the Heart to Heart Background cling stamp. This combo is so much fun. I love all the different combinations of die cut inlay you can do with the die. I also put my Sizzix Sticky Grid paper to the test by cutting out the word LOVE and one of the dies from the Paper Rose Stitched Rectangles set all at the same time.


First I heat embossed the background stamp with Brutus Monroe's excellent Alabaster embossing powder. Then, I used the dip and dry technique with a combination of Tim Holtz's Spray Stains and his Mica Sprays for most of my backgrounds. I used SO many and had a blast. That Mica Spray really gives a pop of glimmer where you need it.

The You die is also from Simon Says Stamp. My embellishments are from my stash. And the cute Valentine cookie cutters are from my friend, Kristen.
Whew! January was a wild ride. Briefly, my daughter got married January 26 and I was the wedding planner. It wasn't an easy job, but everything went off without a hitch.
On to Valentine's Day! I love making Valentine cards because I love the color schemes that include plenty of pinks, reds and purples with lots of white thrown in.
I've made 15 different cards with Simon Says Stamp's Outline Love wafer die set and the Heart to Heart Background cling stamp. This combo is so much fun. I love all the different combinations of die cut inlay you can do with the die. I also put my Sizzix Sticky Grid paper to the test by cutting out the word LOVE and one of the dies from the Paper Rose Stitched Rectangles set all at the same time.
First I heat embossed the background stamp with Brutus Monroe's excellent Alabaster embossing powder. Then, I used the dip and dry technique with a combination of Tim Holtz's Spray Stains and his Mica Sprays for most of my backgrounds. I used SO many and had a blast. That Mica Spray really gives a pop of glimmer where you need it.
The You die is also from Simon Says Stamp. My embellishments are from my stash. And the cute Valentine cookie cutters are from my friend, Kristen.

I recently bought the 2021 release of the Zig Clean Color Real Brush markers. But before that, I used my set of 90 Zig Clean Color markers to color this giant floral image from Memory Box. The Gracious Floral Stamp Set and Die has endless possibilities. I started by stamping the image with a black pigment ink onto watercolor paper. I used the Real Brush markers to color in this wonderful image, choosing just a set of purples and olive greens for everything. Next, I die cut the image with the included die.

I recently bought the 2021 release of the Zig Clean Color Real Brush markers. But before that, I used my set of 90 Zig Clean Color markers to color this giant floral image from Memory Box. The Gracious Floral Stamp Set and Die has endless possibilities. I started by stamping the image with a black pigment ink onto watercolor paper. I used the Real Brush markers to color in this wonderful image, choosing just a set of purples and olive greens for everything. Next, I die cut the image with the included die.

There is so much to love about the new Gracious Floral set from Memory Box Open Studio. I'm a big fan of slimline cards, so I decided to create a high contrast card of mostly black and white. I used the Gracious Floral 3D Embossing Folder with Neenah Classic Crest 110lb cardstock. Here's a tip: spritz your cardstock on one or both sides with one single spritz of water just before you send it through your machine sandwiched inside the folder. This will relax the paper fibers, allowing them to bend instead of crack. Of course, if your cardstock has ink on it, just do the back only.


There is so much to love about the new Gracious Floral set from Memory Box Open Studio. I'm a big fan of slimline cards, so I decided to create a high contrast card of mostly black and white. I used the Gracious Floral 3D Embossing Folder with Neenah Classic Crest 110lb cardstock. Here's a tip: spritz your cardstock on one or both sides with one single spritz of water just before you send it through your machine sandwiched inside the folder. This will relax the paper fibers, allowing them to bend instead of crack. Of course, if your cardstock has ink on it, just do the back only.

With Mother's Day fast approaching, I wanted to put Tim Holtz's Floral Outlines stamp set by Stampers Anonymous to the test. I was eager to combine this with some Lindy's Magicals I had just recently received.
I first used four 4.5 x 6" panels of Canson XL watercolor paper and sprinkled it with 1-2 colors of Lindy's Magical Powders (if you haven't tried these yet, you are *truly* missing something). I used combinations including Cape Cod Coral, Salt Water Taffy, and Clam Bake Beige all from the Nantucket Shimmer Magicals set of 5. I also used Rizzo's Rowdy Red from the Go Greased Lightnin' set of Flat Magicals (no shimmer, but plenty of magic) by itself on one card. After the powder was on the card, I spritzed it with water and let the colors do their thing mixing around on the paper. In a couple of cases, I added a bit more powder.

I sprinkled 1-2 magicals onto my watercolor paper with a dry paintbrush, then spritzed with water to make them come alive. When I had the colors the way I liked them on each of my 4 panels, I dried them with my Ranger Heat Tool. I absolutely love the line art that is the Tim Holtz Floral Outlines stamp set. After my panels were dry, I brushed on anti-static powder (happy this did not dull my watercolor) and stamped this trio of stamps onto my paper with Versamark. For the three pink backgrounds, I used Inkon3's Gold Rush Ultra Fine Embossing Powder to heat emboss with. For the red background, I used Taylored Expression's White Fine Detail Embossing Powder.


With Mother's Day fast approaching, I wanted to put Tim Holtz's Floral Outlines stamp set by Stampers Anonymous to the test. I was eager to combine this with some Lindy's Magicals I had just recently received.
I first used four 4.5 x 6" panels of Canson XL watercolor paper and sprinkled it with 1-2 colors of Lindy's Magical Powders (if you haven't tried these yet, you are *truly* missing something). I used combinations including Cape Cod Coral, Salt Water Taffy, and Clam Bake Beige all from the Nantucket Shimmer Magicals set of 5. I also used Rizzo's Rowdy Red from the Go Greased Lightnin' set of Flat Magicals (no shimmer, but plenty of magic) by itself on one card. After the powder was on the card, I spritzed it with water and let the colors do their thing mixing around on the paper. In a couple of cases, I added a bit more powder.
I sprinkled 1-2 magicals onto my watercolor paper with a dry paintbrush, then spritzed with water to make them come alive. When I had the colors the way I liked them on each of my 4 panels, I dried them with my Ranger Heat Tool. I absolutely love the line art that is the Tim Holtz Floral Outlines stamp set. After my panels were dry, I brushed on anti-static powder (happy this did not dull my watercolor) and stamped this trio of stamps onto my paper with Versamark. For the three pink backgrounds, I used Inkon3's Gold Rush Ultra Fine Embossing Powder to heat emboss with. For the red background, I used Taylored Expression's White Fine Detail Embossing Powder.

The Rainbow Arch die from Poppystamps has a lot of flexibility. It can serve as a cool, graphic semi-circle among other things. I decided to pull out some specialty cardstock and give it a workout.

The Rainbow Arch die from Poppystamps has a lot of flexibility. It can serve as a cool, graphic semi-circle among other things. I decided to pull out some specialty cardstock and give it a workout.

Simple geometric shapes like circles, squares, triangles and hexagons can be a card maker's best friend. I was thrilled to get my hands on the new Poppystamps' Deco Diamond Stencil Set. It has 3 stencils, each featuring smaller and smaller squares. There are lots of possibilities with how to use this versatile set.

Simple geometric shapes like circles, squares, triangles and hexagons can be a card maker's best friend. I was thrilled to get my hands on the new Poppystamps' Deco Diamond Stencil Set. It has 3 stencils, each featuring smaller and smaller squares. There are lots of possibilities with how to use this versatile set.

Like many, I am a huge Tim Holtz fan. I wanted to make a TH themed St. Patrick's Day card using just his products, with the four-leaf clover from the Sizzix Lucky Love Impresslit. I am not a natural at mixed media. I have to experiment, think, study Pinterest, and more, to come up with a mixed media piece I really like. I found a wonderful card by a Finnish artist named Riikka Kovasin here that I loved. Her layout and her use of some of the embellishments inspired me most.


Like many, I am a huge Tim Holtz fan. I wanted to make a TH themed St. Patrick's Day card using just his products, with the four-leaf clover from the Sizzix Lucky Love Impresslit. I am not a natural at mixed media. I have to experiment, think, study Pinterest, and more, to come up with a mixed media piece I really like. I found a wonderful card by a Finnish artist named Riikka Kovasin here that I loved. Her layout and her use of some of the embellishments inspired me most.

It's spring (summer here in Texas) and love is in the air. It's my turn on the Poppystamps blog today and I decided I wanted to use Poppystamps Floral Cake Popup Easel dies to make a wedding cake covered in monochromatic flowers, in keeping with the monthly challenge theme of Floral Fantasy. I chose SU's Soft Suede for the chocolate cake and Pink Pirouette for the icing using the Layer Cake Drip Icing dies. Then, I chose three coordinating shades of a reddish-purple: Sweet Sugarplum, Rich Razzleberry, and Blackberry Bliss, and cut out a lot of flowers. It didn't take long as the individual dies have 4-8 flowers on them. Next, I chose Pear Pizazz and Old Olive for the leaves. Again, I made just a few cuts and I had a lot of leaves to choose from.

It's spring (summer here in Texas) and love is in the air. It's my turn on the Poppystamps blog today and I decided I wanted to use Poppystamps Floral Cake Popup Easel dies to make a wedding cake covered in monochromatic flowers, in keeping with the monthly challenge theme of Floral Fantasy. I chose SU's Soft Suede for the chocolate cake and Pink Pirouette for the icing using the Layer Cake Drip Icing dies. Then, I chose three coordinating shades of a reddish-purple: Sweet Sugarplum, Rich Razzleberry, and Blackberry Bliss, and cut out a lot of flowers. It didn't take long as the individual dies have 4-8 flowers on them. Next, I chose Pear Pizazz and Old Olive for the leaves. Again, I made just a few cuts and I had a lot of leaves to choose from.

The newest release from Poppystamps is all kinds of wonderful. It's full of butterflies, florals of every size and shape with lots of detail, and big fun things like ice cream and cake. And stamps! Big, flourish-y sentiments with matching dies that work wonders on everything. I'm kinda smitten. Can ya tell?


The newest release from Poppystamps is all kinds of wonderful. It's full of butterflies, florals of every size and shape with lots of detail, and big fun things like ice cream and cake. And stamps! Big, flourish-y sentiments with matching dies that work wonders on everything. I'm kinda smitten. Can ya tell?

I just love the My Favorite Things Roses All Over stamp. It's elegant and so very flexible. I decided to enter the MFT Weekly Sketch Challenge #583 (#MFTWSC583) with it. I heat embossed the image with white embossing powder onto watercolor paper and then watercolored four different squares with my Zig Clean Color Real Brush Markers to have them represent the four seasons.

I just love the My Favorite Things Roses All Over stamp. It's elegant and so very flexible. I decided to enter the MFT Weekly Sketch Challenge #583 (#MFTWSC583) with it. I heat embossed the image with white embossing powder onto watercolor paper and then watercolored four different squares with my Zig Clean Color Real Brush Markers to have them represent the four seasons.

