

Another fantastic die set from Vicky Papaioannou’s Whimsical Village Collection* by Spellbinders is the Whimsical Blooms* dies. These Dr. Seuss-like flowers work beautifully alone or in a group. They are super simple to assemble. Just find a great color combo you like and put it all together.

Here I mixed Spellbinders Colorwheel cardstock in Sicily, Bellini, Coral, Breeze, Malibu and Acorn to make this funky little garden. I used an A2 panel of the Malibu for the base. Next, I die cut a stitched rectangle from the Spellbinders Nested Postage Labels and Tag die set using Neenah Desert Storm cardstock. I first splattered the Neenah cardstock with Tim Holtz Distress Spray Stain in Picket Fence. I cut all my flowers and stems and assembled them using liquid glue and thin foam adhesive on the Desert Storm panel. I put a sentiment from the Whimsical Wishes stamp set stamped in dark brown ink on white cardstock over the stems. This card came together very quickly and was fun to make.
Affiliate links are used in this post at no cost to you. This means I may receive a small commission when you click through and shop using the links I provide. This helps support me in creating and posting my crafts. Items marked with an asterisk * at first mention were provided by a store or manufacturer. Otherwise, all items were purchased by me.
Another fantastic die set from Vicky Papaioannou’s Whimsical Village Collection* by Spellbinders is the Whimsical Blooms* dies. These Dr. Seuss-like flowers work beautifully alone or in a group. They are super simple to assemble. Just find a great color combo you like and put it all together.
Here I mixed Spellbinders Colorwheel cardstock in Sicily, Bellini, Coral, Breeze, Malibu and Acorn to make this funky little garden. I used an A2 panel of the Malibu for the base. Next, I die cut a stitched rectangle from the Spellbinders Nested Postage Labels and Tag die set using Neenah Desert Storm cardstock. I first splattered the Neenah cardstock with Tim Holtz Distress Spray Stain in Picket Fence. I cut all my flowers and stems and assembled them using liquid glue and thin foam adhesive on the Desert Storm panel. I put a sentiment from the Whimsical Wishes stamp set stamped in dark brown ink on white cardstock over the stems. This card came together very quickly and was fun to make.
Affiliate links are used in this post at no cost to you. This means I may receive a small commission when you click through and shop using the links I provide. This helps support me in creating and posting my crafts. Items marked with an asterisk * at first mention were provided by a store or manufacturer. Otherwise, all items were purchased by me.
If I were ever stuck on a desert island with only a select number of craft supplies, the Waffle Flower Postage Collage (PC) collection would be at the top of my list. One of the most viral stamp/die/stencil collections ever made, I never get tired of using it and trying more and more ways to combine them all.

Today’s card using the original Postage Collage A2 Die, the PC Envelope Die, the PC Envelope Stencil, the PC Collage Mini Seals Die and the original Postage Collage Stamp Set.
I started with the stencil and ink blended using Tim Holtz Distress Ink in Tumbled Glass and Faded Jeans, and Stampin’ Up!’s Crumb Cake ink.
I colored in the tiny hearts formed by the die with a Uni-ball Signo Gold Gel pen.

Next, I used the original Postage Collage A2 die and cut the stenciled panel to make it look like a sheet of stamps. Using Gina K’s Amalgam black inkpad, I stamped with the PC stamp set in 3 places.
Now that my background was done, I die cut an envelope, an envelope liner, a little paper note, and a tiny seal all with the PC Mini Seals die set and scraps of cardstock. I inked the edges of the letter, and I stamped a tiny little heart-circle in Versamark inside the little seal using the Simon Says Stamp Easter Greetings Stamp set (I was so happy to discover this little stamp in my stamp collection). I assembled everything as shown and added a Gold foiled Happy Birthday sentiment from the Spellbinders You Are Everything Press Plate and Die set with foam tape. I backed the panel with Stampin’ Up!’s Crumb Cake cardstock and then with Spellbinders Malibu cardstock.
Affiliate links are used in this post at no cost to you. This means I may receive a small commission when you click through and shop using the links I provide. This helps support me in creating and posting my crafts. Items marked with an asterisk * at first mention were provided by a store or manufacturer. Otherwise, all items were purchased by me. I do not get paid to promote any products.
SUPPLIES USED
If I were ever stuck on a desert island with only a select number of craft supplies, the Waffle Flower Postage Collage (PC) collection would be at the top of my list. One of the most viral stamp/die/stencil collections ever made, I never get tired of using it and trying more and more ways to combine them all.
Today’s card using the original Postage Collage A2 Die, the PC Envelope Die, the PC Envelope Stencil, the PC Collage Mini Seals Die and the original Postage Collage Stamp Set.
I started with the stencil and ink blended using Tim Holtz Distress Ink in Tumbled Glass and Faded Jeans, and Stampin’ Up!’s Crumb Cake ink.
I colored in the tiny hearts formed by the die with a Uni-ball Signo Gold Gel pen.
Next, I used the original Postage Collage A2 die and cut the stenciled panel to make it look like a sheet of stamps. Using Gina K’s Amalgam black inkpad, I stamped with the PC stamp set in 3 places.
Now that my background was done, I die cut an envelope, an envelope liner, a little paper note, and a tiny seal all with the PC Mini Seals die set and scraps of cardstock. I inked the edges of the letter, and I stamped a tiny little heart-circle in Versamark inside the little seal using the Simon Says Stamp Easter Greetings Stamp set (I was so happy to discover this little stamp in my stamp collection). I assembled everything as shown and added a Gold foiled Happy Birthday sentiment from the Spellbinders You Are Everything Press Plate and Die set with foam tape. I backed the panel with Stampin’ Up!’s Crumb Cake cardstock and then with Spellbinders Malibu cardstock.
Affiliate links are used in this post at no cost to you. This means I may receive a small commission when you click through and shop using the links I provide. This helps support me in creating and posting my crafts. Items marked with an asterisk * at first mention were provided by a store or manufacturer. Otherwise, all items were purchased by me. I do not get paid to promote any products.
SUPPLIES USED

I love autumn and Halloween and almost everything that goes with them (with the possible exception of gory slasher movies). So when I received the 2022 Poppystamps Halloween release in the mail, I was thrilled to see so many autumn and Halloween dies. What caught my eye first was the Twisted Houses die set. One die cuts out four houses. I immediately had the idea for this haunted neighborhood spread out over a slimline card.
I started with the flatter side of a piece of Arches watercolor paper. I put four drops of Stampin’ Up!’s Smoky Slate reinker into a tiny Ranger mister along with some water. I spritzed the paper several times and dried with a heat tool. I punched a 2” circle from Gina K designs masking paper. I put it down to serve as my moon and then using foam blenders (1 per color), I blended Distress Oxides in Scattered Straw, Wild Honey, Spiced Marmalade, Seedless Preserves, Chipped Sapphire and Black Soot to create the night sky. I removed the mask and gently inked the edge of the moon with a dab of Scattered Straw Distress Oxide. I replaced the mask and spritzed and splattered the page with water, dabbing up the water and drying it to make it look spotty. Finally, I cut the piece to 8.25” x 3.25” and mounted it to a cardbase made of Stampin’ Up!’s Concord Crush. My background was done.
- Twisted Houses NEW
- Cabin Snowglobe Pop Up Easel Set (bare trees)
- Snowman and Trees (more trees)
- Cottage Globe (fence)
- Pile of Pumpkins
- Boo Poe Script NEW
- Whittle Creatures (ghost) NEW


A clean and simple feline card came together for several challenges. The challenges called for using green, making it vibrant, using a pet, using a cat, and using a curve. I love trying to hit so many requirements with one card. It's like solving a puzzle. The cat rubber stamp I've had for several years. I purchased it at The Paper Crown in Waco, Texas. It's called Meow Mix but I'm going to need to research the manufacturer. I stamped it on Gina K Pure Luxury Heavyweight white cardstock with Memento Tuxedo Black ink. I colored in tiny portions with gray and pink Copic and Spectrum Noir markers. I fussy cut it. I used a circle cutter to cut a large circle from the corner of a piece of white cardstock. Underneath that I put the green and white polka dot paper from Jillibean Soup (Soup Staples in Olive Sugar). I punched three hearts from SU's Melon Mambo cardstock with a retired triple heart punch from Stampin' Up!. I adhered the cat with foam adhesive and then the hearts, and then added the sentiment strip from Paper Rose.
A clean and simple feline card came together for several challenges. The challenges called for using green, making it vibrant, using a pet, using a cat, and using a curve. I love trying to hit so many requirements with one card. It's like solving a puzzle. The cat rubber stamp I've had for several years. I purchased it at The Paper Crown in Waco, Texas. It's called Meow Mix but I'm going to need to research the manufacturer. I stamped it on Gina K Pure Luxury Heavyweight white cardstock with Memento Tuxedo Black ink. I colored in tiny portions with gray and pink Copic and Spectrum Noir markers. I fussy cut it. I used a circle cutter to cut a large circle from the corner of a piece of white cardstock. Underneath that I put the green and white polka dot paper from Jillibean Soup (Soup Staples in Olive Sugar). I punched three hearts from SU's Melon Mambo cardstock with a retired triple heart punch from Stampin' Up!. I adhered the cat with foam adhesive and then the hearts, and then added the sentiment strip from Paper Rose.

Do you ever just throw everything you have at a card hoping something will work? That's what I did here, and I'm actually pleased with the way it turned out. I was inspired by the Freshly Made Sketches Challenge #524 (FMS524). I started out with one of my favorite digital stamps ever, a Hero Arts digital stamp of a butterfly. It is colored with pale blue, pale green, and brown Copic markers and then highlighted with Glossy Accents. Sadly, the shine from the GA doesn't show up in the photo.

I created a 2" square watercolor background using a Stampin' Up! Crushed Curry ink refill as the paint. I had a nice watercolor texture, but them covered it up with Wild Honey Distress Oxide ink through the Tim Holtz Ringer stencil. I had a precut film strip from my Silhouette and used Stampin' Up! Island Indigo and Broken China Distress Ink to color it. The color was a little bright and competed with the butterfly, so I knocked it down a bit by using a Bo Bunny Terrific Textures stamp in black ink on top of it. I wanted a little more black and chose a circle-pattern stamp from one of my favorite Stampin' Up! sets, Kinda Eclectic to stamp with Memento Tuxedo Black at the top of the square.
Yep, it still needed more. I added two pieces of greenery die cut from the Tim Holtz Sizzix set Garden Greens (just got this the other day and I love it). I used a piece of Kiwi Metallic Cover stock from the Paper Company that I've had in my stash for a long time. I finished off my little square by adhering three clear Fairy Drops by Poppystamps with Nuvo Crystal Drops. I mounted the square on Gina K's 110lb Pure Luxury white cardstock embossed with one of my favorite embossing folders, Tim Holtz Texture Fades Blueprint. Finally, to follow the sketch, I added my sentiment. For You was cut (2 cuts stacked for each word) with Spellbinders Simply Perfect Mix and Match Sentiments.
Frankly, I'm amazed at all the products I used. I've been in a bit of a creative rut lately and entering challenges is a great way to get out of them. Sometimes, throwing everything you have at something is just the ticket.
I am entering this at Freshly Made Sketches #524, Simon Says Stamp Wednesday Challenge, and Passion For Markers Week 629 (Things with Wings), Hero Arts Challenge
Do you ever just throw everything you have at a card hoping something will work? That's what I did here, and I'm actually pleased with the way it turned out. I was inspired by the Freshly Made Sketches Challenge #524 (FMS524). I started out with one of my favorite digital stamps ever, a Hero Arts digital stamp of a butterfly. It is colored with pale blue, pale green, and brown Copic markers and then highlighted with Glossy Accents. Sadly, the shine from the GA doesn't show up in the photo.
I created a 2" square watercolor background using a Stampin' Up! Crushed Curry ink refill as the paint. I had a nice watercolor texture, but them covered it up with Wild Honey Distress Oxide ink through the Tim Holtz Ringer stencil. I had a precut film strip from my Silhouette and used Stampin' Up! Island Indigo and Broken China Distress Ink to color it. The color was a little bright and competed with the butterfly, so I knocked it down a bit by using a Bo Bunny Terrific Textures stamp in black ink on top of it. I wanted a little more black and chose a circle-pattern stamp from one of my favorite Stampin' Up! sets, Kinda Eclectic to stamp with Memento Tuxedo Black at the top of the square.
Yep, it still needed more. I added two pieces of greenery die cut from the Tim Holtz Sizzix set Garden Greens (just got this the other day and I love it). I used a piece of Kiwi Metallic Cover stock from the Paper Company that I've had in my stash for a long time. I finished off my little square by adhering three clear Fairy Drops by Poppystamps with Nuvo Crystal Drops. I mounted the square on Gina K's 110lb Pure Luxury white cardstock embossed with one of my favorite embossing folders, Tim Holtz Texture Fades Blueprint. Finally, to follow the sketch, I added my sentiment. For You was cut (2 cuts stacked for each word) with Spellbinders Simply Perfect Mix and Match Sentiments.
Frankly, I'm amazed at all the products I used. I've been in a bit of a creative rut lately and entering challenges is a great way to get out of them. Sometimes, throwing everything you have at something is just the ticket.
I am entering this at Freshly Made Sketches #524, Simon Says Stamp Wednesday Challenge, and Passion For Markers Week 629 (Things with Wings), Hero Arts Challenge
I was so excited to be chosen as the Featured Artist over on the As You See It Challenge two weeks ago. It's a super fun challenge blog with an extremely talented design team. This week's challenge is a recipe challenge. I have never done one of those before but I really like having to include a variety of different things into my card design. It's like the paper version of the TV show 'Chopped.'
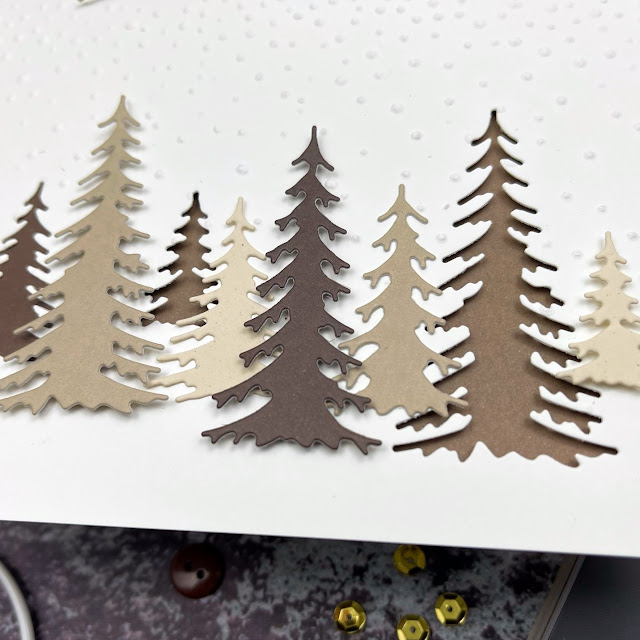
This week the challenge is titled Recipe to Celebrate Neutrality. Your mission is to use a one-word sentiment, an embossing folder, ribbon or twine, a punch or die, and a neutral palette. Since I'm fully into Christmas crafting right now, I had an idea for a forest and it was going to check all the boxes.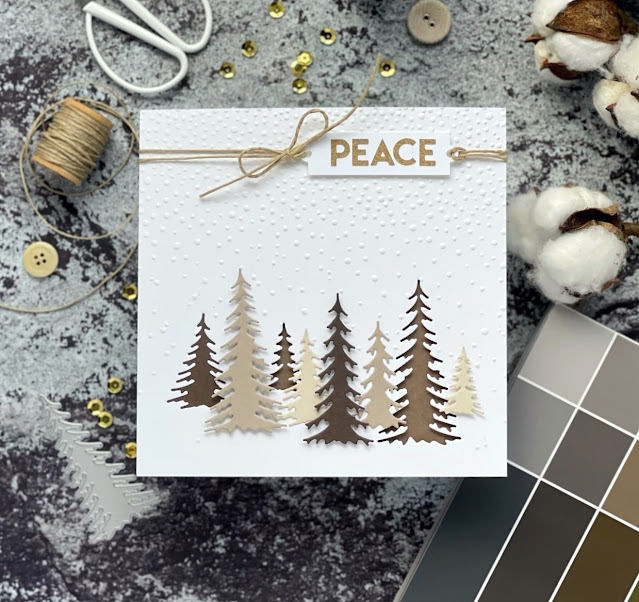

I was so excited to be chosen as the Featured Artist over on the As You See It Challenge two weeks ago. It's a super fun challenge blog with an extremely talented design team. This week's challenge is a recipe challenge. I have never done one of those before but I really like having to include a variety of different things into my card design. It's like the paper version of the TV show 'Chopped.'
This week the challenge is titled Recipe to Celebrate Neutrality. Your mission is to use a one-word sentiment, an embossing folder, ribbon or twine, a punch or die, and a neutral palette. Since I'm fully into Christmas crafting right now, I had an idea for a forest and it was going to check all the boxes.

I made this card by using the Poppystamps Diamond Snowflake die set and cutting out snowflakes from 3 different colors of glitter cardstock. I stacked them one on top of the other so that parts of all 3 would show. I also used a gorgeous 3D embossing folder to emboss the white panel. I matted the white panel onto dark green glitter cardstock and then onto a seafoam green colored cardstock. I added gemstones on and around the snowflake and finished the card with a die cut sentiment from a new Poppystamps Christmas stamp and die set.

Ink: Memento Tuxedo Black ink
Embossing Folder: Memory Box Stunning Mandala
Stamp & Dies: Poppystamps Diamond Snowflake die set, Gilded Christmas Wishes Stamp & Die set
Embellishments: Poppystamps Winter Fantasy Fairy Gemstones, Christmas Fairy Jewels
I made this card by using the Poppystamps Diamond Snowflake die set and cutting out snowflakes from 3 different colors of glitter cardstock. I stacked them one on top of the other so that parts of all 3 would show. I also used a gorgeous 3D embossing folder to emboss the white panel. I matted the white panel onto dark green glitter cardstock and then onto a seafoam green colored cardstock. I added gemstones on and around the snowflake and finished the card with a die cut sentiment from a new Poppystamps Christmas stamp and die set.
Ink: Memento Tuxedo Black ink
Embossing Folder: Memory Box Stunning Mandala
Stamp & Dies: Poppystamps Diamond Snowflake die set, Gilded Christmas Wishes Stamp & Die set
Embellishments: Poppystamps Winter Fantasy Fairy Gemstones, Christmas Fairy Jewels
I haven't made a spinner card in years, but I want to send one to a family with young kids for Christmas. No time like the present.


Ingredients
Cardstock: Gina K Pure Luxury Heavyweight, Neenah Classic Crest Solar White 110lb, Bazzill Icy Mint 80lb
Stamps: MFT Warm Hugs & Frosty Kisses, snowflakes from Stampin' Up! Perpetual Birthday Calendar
Ink: Memento Tuxedo Black, White Picket Distress Ink, Mermaid Lagoon and Tumbled Glass Distress Oxides
Alcohol Markers: Dick Blick, Spectrum Noir Tri-blend Dull Green, Copic markers on Neenah CS
Dies: MFT Spin & Slide Channels, MFT Warm Hugs & Frosty Kisses, Lawn Fawn Stitched Hillside Borders
Extras: MFT Spin & Slide discs, Signo White Gel pen, Nuvo Crystal Drops in Morning Dew
Challenges: MFT Slimline card challenge, Simon Says Stamp Wednesday Challenge,
I haven't made a spinner card in years, but I want to send one to a family with young kids for Christmas. No time like the present.
Ingredients
Cardstock: Gina K Pure Luxury Heavyweight, Neenah Classic Crest Solar White 110lb, Bazzill Icy Mint 80lb
Stamps: MFT Warm Hugs & Frosty Kisses, snowflakes from Stampin' Up! Perpetual Birthday Calendar
Ink: Memento Tuxedo Black, White Picket Distress Ink, Mermaid Lagoon and Tumbled Glass Distress Oxides
Alcohol Markers: Dick Blick, Spectrum Noir Tri-blend Dull Green, Copic markers on Neenah CS
Dies: MFT Spin & Slide Channels, MFT Warm Hugs & Frosty Kisses, Lawn Fawn Stitched Hillside Borders
Extras: MFT Spin & Slide discs, Signo White Gel pen, Nuvo Crystal Drops in Morning Dew
Challenges: MFT Slimline card challenge, Simon Says Stamp Wednesday Challenge,
Happy World Card Making Day! I hope this post finds you doing just that. I had so much fun with this sweet little barn animal and his messy greeting. I started by cutting the Poppystamps' Whittle Pig from both a light and dark peach colored cardstock, so I could use the darker nose portion in place of the lighter one. Next I wanted to get the look of splattered mud, but with some control. So I took Gathered Twigs Distress Oxide ink and using Stampin' Up Gorgeous Grunge splatter-looking stamp, I carefully stamped on the lower portion of the pig.

Using the Poppystamps Whittle Wood Picture Frames dies, I cut the larger wooden frame from kraft cardstock. I used the same wood frame die to cut a leftover stenciled background with sky and grass, and then used the negative portion from that inside my kraft frame. I also used this die to cut the lower portion of my piggy, so it would fit perfectly inside the frame.


The mud came from the hanging frost and icicles piece that is found in the Winter House Pop Up Easel die. I trimmed these pieces down, covered them with a glossy glaze, and glued them on top and behind the frame.
Happy World Card Making Day! I hope this post finds you doing just that. I had so much fun with this sweet little barn animal and his messy greeting. I started by cutting the Poppystamps' Whittle Pig from both a light and dark peach colored cardstock, so I could use the darker nose portion in place of the lighter one. Next I wanted to get the look of splattered mud, but with some control. So I took Gathered Twigs Distress Oxide ink and using Stampin' Up Gorgeous Grunge splatter-looking stamp, I carefully stamped on the lower portion of the pig.
Using the Poppystamps Whittle Wood Picture Frames dies, I cut the larger wooden frame from kraft cardstock. I used the same wood frame die to cut a leftover stenciled background with sky and grass, and then used the negative portion from that inside my kraft frame. I also used this die to cut the lower portion of my piggy, so it would fit perfectly inside the frame.
The mud came from the hanging frost and icicles piece that is found in the Winter House Pop Up Easel die. I trimmed these pieces down, covered them with a glossy glaze, and glued them on top and behind the frame.


I was thrilled to have my card chosen by the Color Hues Color Challenge as the winner of their 24th challenge with my Coral & Turquoise card. As a result, they have graciously asked me to be the guest designer for challenge #26. Pink and purple are the challenge colors, and they are not just for unicorns and Disney princesses anymore. When I think of these two colors, I think of flowers. My husband loves to grow flowers in our backyard and lilies in our koi pond and they are most often pink and purple. I recently purchased a gorgeous 6x6" background stamp from My Favorite Things called Roses All Over Background. It is stunning, and a big departure from the adorable animal stamps I know them for. It is not new in their catalog; I've simply never seen it until recently. I stamped this on watercolor paper with Versamark (I got the best results from putting the paper down onto the stamp and pressing) and then heat embossing in white. I used only 2 of my Zig Clean Color Real Brush markers to put the color down. Then I used a water brush to spread it onto the rose pattern, even blending a little here and there.
To let the beauty of the stamp and the colors shine through (and to not stray from pink and purple), I kept the sentiment short, sweet, and black and white. It needed more than a stamped phrase, but not much more. I don't yet own any script dies (soon, I promise), so I used my Silhouette. I used the Silhouette's offset feature to get the black background. I pop dotted everything off a white background and I was done. The card will fit into a 5.5" square envelope.


CS: Gina K Pure Luxury Heavy Weight 110lb, Canson XL cold press watercolor paper, Bazzill Licorice Twist
Ink: Versamark
Die: Silhouette used with font Bigfat Script from Fontspace.com
Embossing Powder: Taylored Expressions Fine Detail White Embossing Powder
Watercolor: Zig Clean Color Real Brush Markers in Lilac 080 and Pink 025; Pentel waterbrush with largest tip
I was thrilled to have my card chosen by the Color Hues Color Challenge as the winner of their 24th challenge with my Coral & Turquoise card. As a result, they have graciously asked me to be the guest designer for challenge #26. Pink and purple are the challenge colors, and they are not just for unicorns and Disney princesses anymore. When I think of these two colors, I think of flowers. My husband loves to grow flowers in our backyard and lilies in our koi pond and they are most often pink and purple. I recently purchased a gorgeous 6x6" background stamp from My Favorite Things called Roses All Over Background. It is stunning, and a big departure from the adorable animal stamps I know them for. It is not new in their catalog; I've simply never seen it until recently. I stamped this on watercolor paper with Versamark (I got the best results from putting the paper down onto the stamp and pressing) and then heat embossing in white. I used only 2 of my Zig Clean Color Real Brush markers to put the color down. Then I used a water brush to spread it onto the rose pattern, even blending a little here and there.
To let the beauty of the stamp and the colors shine through (and to not stray from pink and purple), I kept the sentiment short, sweet, and black and white. It needed more than a stamped phrase, but not much more. I don't yet own any script dies (soon, I promise), so I used my Silhouette. I used the Silhouette's offset feature to get the black background. I pop dotted everything off a white background and I was done. The card will fit into a 5.5" square envelope.
CS: Gina K Pure Luxury Heavy Weight 110lb, Canson XL cold press watercolor paper, Bazzill Licorice Twist
Ink: Versamark
Die: Silhouette used with font Bigfat Script from Fontspace.com
Embossing Powder: Taylored Expressions Fine Detail White Embossing Powder
Watercolor: Zig Clean Color Real Brush Markers in Lilac 080 and Pink 025; Pentel waterbrush with largest tip


I love watercolor a lot, but sometimes it intimidates me. So when I had the idea to simply combine 3 colors (red, orange, purple) in a messy way, I knew it wouldn't be too hard. I used my Zig Clean Color Real Brush Markers in a couple of orange, a couple of red, and a couple of purple shades. Then I used a large Pentel waterbrush, I simply spread the color over some watercolor paper, making sure to avoid mixing blue-purple with orange as I knew that would not blend too well (they are too close to opposites on the color wheel). I kept red in the middle of the other colors. I literally painted with one color a little with the marker, then spread it with the waterbrush. I kept going until I had covered an area about 8" x 3". Then I sent the watercolor paper through my Silhouette and cut the word "wish." Then I cut BIG out and painted it with one shade of purple after it was cut. I overlapped the letters and added pop dots to the w and the s. I added several sequins and called it a day.


CS: Background is Gina K Pure Luxury Heavyweight 110lb, Watercolor cardstock is Canson XL Cold press
Watercolor markers: Zig Clean Color Real Brush markers in Red, Geranium Red, Wine Red, Carmine Red, Deep Red, Scarlet Red, Orange, Purple, Violet, and Deep Violet
Pentel Waterbrush, largest size
Fonts used in Silhouette: Tondu and Bebas Neue found on DaFont.com.
Sequins from Amazon.com.
Challenges: CAS Mixup September Watercolour Challenge, Happy Little Stampers Anything Goes with a Die, Happy Little Stampers Watercolor Anything Goes, Color Throwdown 659, Simon Says Stamp Wednesday Challenge: Sparkle & Shine
I love watercolor a lot, but sometimes it intimidates me. So when I had the idea to simply combine 3 colors (red, orange, purple) in a messy way, I knew it wouldn't be too hard. I used my Zig Clean Color Real Brush Markers in a couple of orange, a couple of red, and a couple of purple shades. Then I used a large Pentel waterbrush, I simply spread the color over some watercolor paper, making sure to avoid mixing blue-purple with orange as I knew that would not blend too well (they are too close to opposites on the color wheel). I kept red in the middle of the other colors. I literally painted with one color a little with the marker, then spread it with the waterbrush. I kept going until I had covered an area about 8" x 3". Then I sent the watercolor paper through my Silhouette and cut the word "wish." Then I cut BIG out and painted it with one shade of purple after it was cut. I overlapped the letters and added pop dots to the w and the s. I added several sequins and called it a day.
CS: Background is Gina K Pure Luxury Heavyweight 110lb, Watercolor cardstock is Canson XL Cold press
Watercolor markers: Zig Clean Color Real Brush markers in Red, Geranium Red, Wine Red, Carmine Red, Deep Red, Scarlet Red, Orange, Purple, Violet, and Deep Violet
Pentel Waterbrush, largest size
Fonts used in Silhouette: Tondu and Bebas Neue found on DaFont.com.
Sequins from Amazon.com.
Challenges: CAS Mixup September Watercolour Challenge, Happy Little Stampers Anything Goes with a Die, Happy Little Stampers Watercolor Anything Goes, Color Throwdown 659, Simon Says Stamp Wednesday Challenge: Sparkle & Shine
I just love the MFT Warm Hugs & Frosty Kisses stamps and dies, and when I found a sketch challenge from MFT and a color challenge on Color Throwdown, I had my plan. Putting the star together was a challenge. I used my Silhouette to cut the star. I used Chipped Sapphire Distress Oxide to ink the sky, with a few well placed water droplets for stars. Next I used the Lawn Fawn Stitched Hillside Borders dies to cut the hills. If I had thought it through, I simply would have used precut stars with the hillside borders, so everything would stack neatly. Instead I just used some scrap cardstock and glued it down, then trimmed the edges to fit the star shape base. That was not easy. I used light blue cardstock sprayed with pearl glimmer mist for the ice. I did precut this in a star shape, so that made fitting the lower half onto the star very easy. The sweet doggy and penguin are colored with alcohol ink markers. The sentiment is printed from my laser printer and backed with a slip of SU's Night of Navy.


Ingredients:
CS: Neenah Classic Crest Solar White 110lb, Gina K Pure Luxury 110lb, Stampin' Up! Crumb Cake, Night of Navy (under sentiment), Seaside Spray (ice)
Stamps: MFT Warm Hugs & Frosty Kisses
Ink: Tuxedo Black Memento Ink, Stampin' Up! Smoky Slate (ice patch)
Dies: MFT Warm Hugs & Frosty Kisses, Lawn Fawn Stitched Hillside Borders
Alcohol Ink markers: Copic B41, B45, Dick Blick cool grays
Glimmer effects: Tattered Angels Glimmer Mist in Pearl, Clear Wink of Stella on trees
Embellishments: Stampin' Up! Elegant Faceted Gems
Challenges: MFT Sketch Challenge 557, Simon Says Stamp Monday Challenge, Simon Says Stamp Wednesday Challenge, Kat Scrappiness September Challenge, Clever Dexter Challenge 21, Color Throwdown 658
I just love the MFT Warm Hugs & Frosty Kisses stamps and dies, and when I found a sketch challenge from MFT and a color challenge on Color Throwdown, I had my plan. Putting the star together was a challenge. I used my Silhouette to cut the star. I used Chipped Sapphire Distress Oxide to ink the sky, with a few well placed water droplets for stars. Next I used the Lawn Fawn Stitched Hillside Borders dies to cut the hills. If I had thought it through, I simply would have used precut stars with the hillside borders, so everything would stack neatly. Instead I just used some scrap cardstock and glued it down, then trimmed the edges to fit the star shape base. That was not easy. I used light blue cardstock sprayed with pearl glimmer mist for the ice. I did precut this in a star shape, so that made fitting the lower half onto the star very easy. The sweet doggy and penguin are colored with alcohol ink markers. The sentiment is printed from my laser printer and backed with a slip of SU's Night of Navy.
Ingredients:
CS: Neenah Classic Crest Solar White 110lb, Gina K Pure Luxury 110lb, Stampin' Up! Crumb Cake, Night of Navy (under sentiment), Seaside Spray (ice)
Stamps: MFT Warm Hugs & Frosty Kisses
Ink: Tuxedo Black Memento Ink, Stampin' Up! Smoky Slate (ice patch)
Dies: MFT Warm Hugs & Frosty Kisses, Lawn Fawn Stitched Hillside Borders
Alcohol Ink markers: Copic B41, B45, Dick Blick cool grays
Glimmer effects: Tattered Angels Glimmer Mist in Pearl, Clear Wink of Stella on trees
Embellishments: Stampin' Up! Elegant Faceted Gems
Challenges: MFT Sketch Challenge 557, Simon Says Stamp Monday Challenge, Simon Says Stamp Wednesday Challenge, Kat Scrappiness September Challenge, Clever Dexter Challenge 21, Color Throwdown 658
It's been too long since I made a truly clean and simple card, so I was thrilled to find this sketch challenge from the CAS Colours and Sketches. And then I found a couple more great challenges (listed below). I stamped my brand new Sunny Vibes "beach doggy" on cardstock, colored with Copics and Dick Blick alcohol markers (see below) and then stamped the perfect sentiment from the same stamp set repeatedly (yes, a stamp platform is mandatory for this). Pop-dotted the little cutie and I was done.


It's been too long since I made a truly clean and simple card, so I was thrilled to find this sketch challenge from the CAS Colours and Sketches. And then I found a couple more great challenges (listed below). I stamped my brand new Sunny Vibes "beach doggy" on cardstock, colored with Copics and Dick Blick alcohol markers (see below) and then stamped the perfect sentiment from the same stamp set repeatedly (yes, a stamp platform is mandatory for this). Pop-dotted the little cutie and I was done.
I was so excited to get MFT's Warm Hugs & Frosty Kisses in the mail. I have ideas coming out my ears. I wanted to enter the MFT Slimline Challenge to make an autumn-themed slimline. I started by using a blend of 4 Distress Oxide inks on my Gina K cardstock. Then I used my alcohol ink markers to color in these sweet, tiny penguins (all the while dreaming of sweater weather). I die cut them, and cut the hills and trees on my Silhouette Cameo. The hardest part of this card was cutting small enough pieces of my foam adhesive to fit the back of the trees.


I was so excited to get MFT's Warm Hugs & Frosty Kisses in the mail. I have ideas coming out my ears. I wanted to enter the MFT Slimline Challenge to make an autumn-themed slimline. I started by using a blend of 4 Distress Oxide inks on my Gina K cardstock. Then I used my alcohol ink markers to color in these sweet, tiny penguins (all the while dreaming of sweater weather). I die cut them, and cut the hills and trees on my Silhouette Cameo. The hardest part of this card was cutting small enough pieces of my foam adhesive to fit the back of the trees.
Inspired by a Toni Maddox (@frankiehelpscraft) card using this Bubbles of Joy stamp set from Lawn Fawn, I gave my mice a cute house complete with door, chimney and a very nice lawn. I limited myself to 3 colors: pink, gray and mint green in order to stick with a color challenge theme. That color restrictions made for a lot of fun. I am still in love with slimline cards.


Inspired by a Toni Maddox (@frankiehelpscraft) card using this Bubbles of Joy stamp set from Lawn Fawn, I gave my mice a cute house complete with door, chimney and a very nice lawn. I limited myself to 3 colors: pink, gray and mint green in order to stick with a color challenge theme. That color restrictions made for a lot of fun. I am still in love with slimline cards.

